The instructions and pointers below will help get you up to speed in navigating all the helpful tools and features in FundEasy!
Home Page
When you log into the new FundEasy, you'll land on the Home page.
This page:
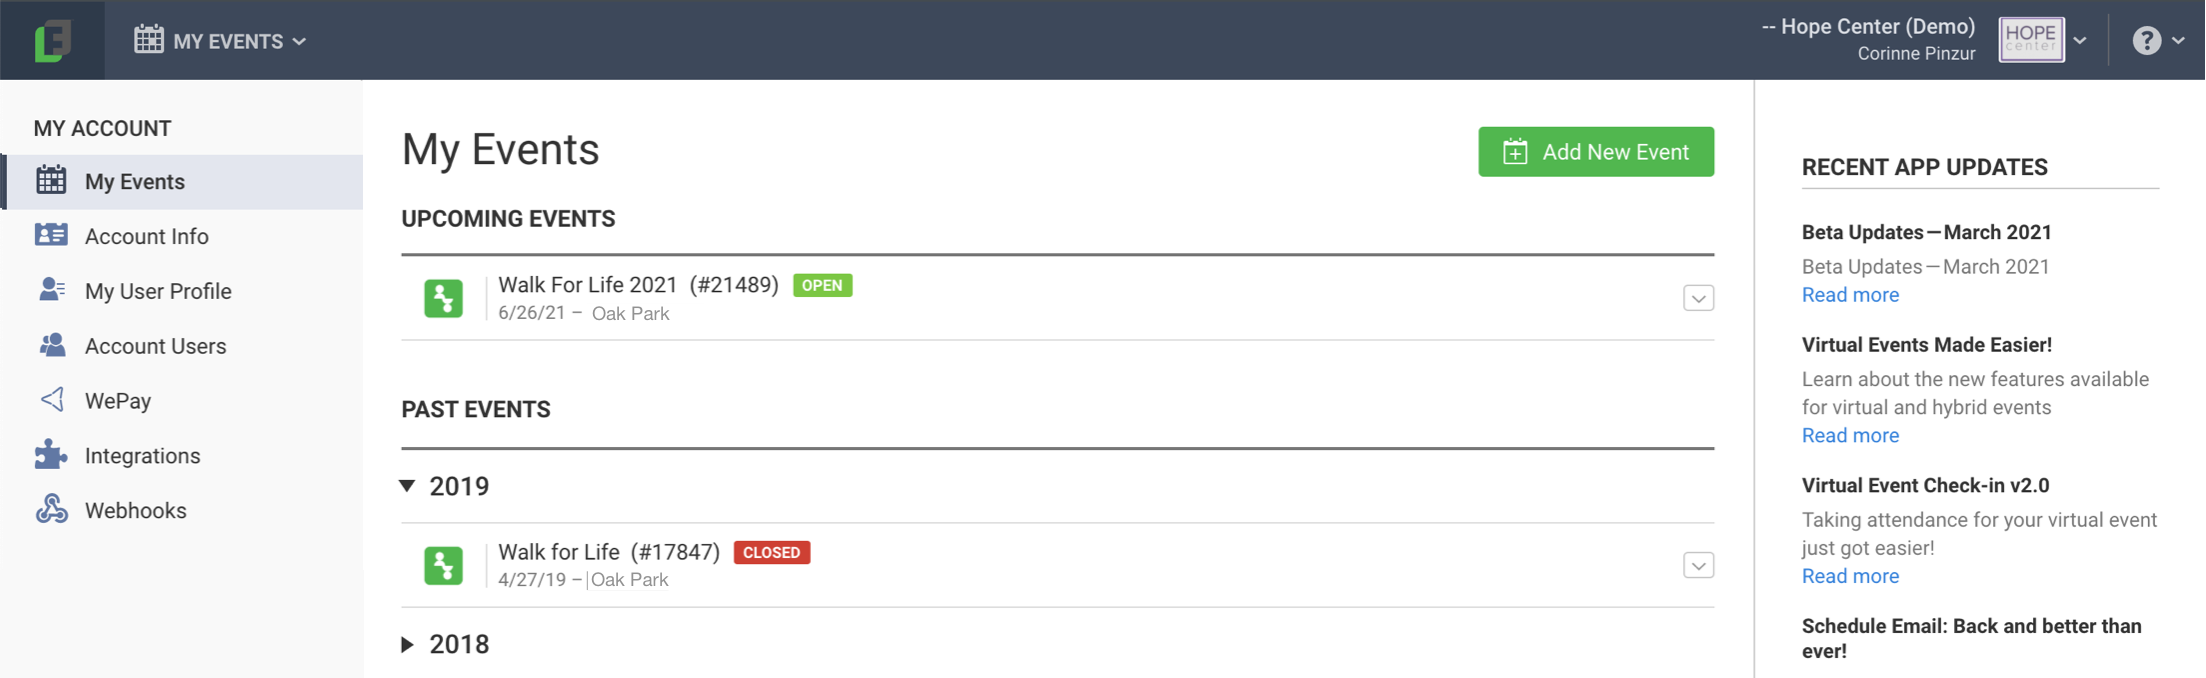
shows your account tools, like Account Info, Account Users, and more
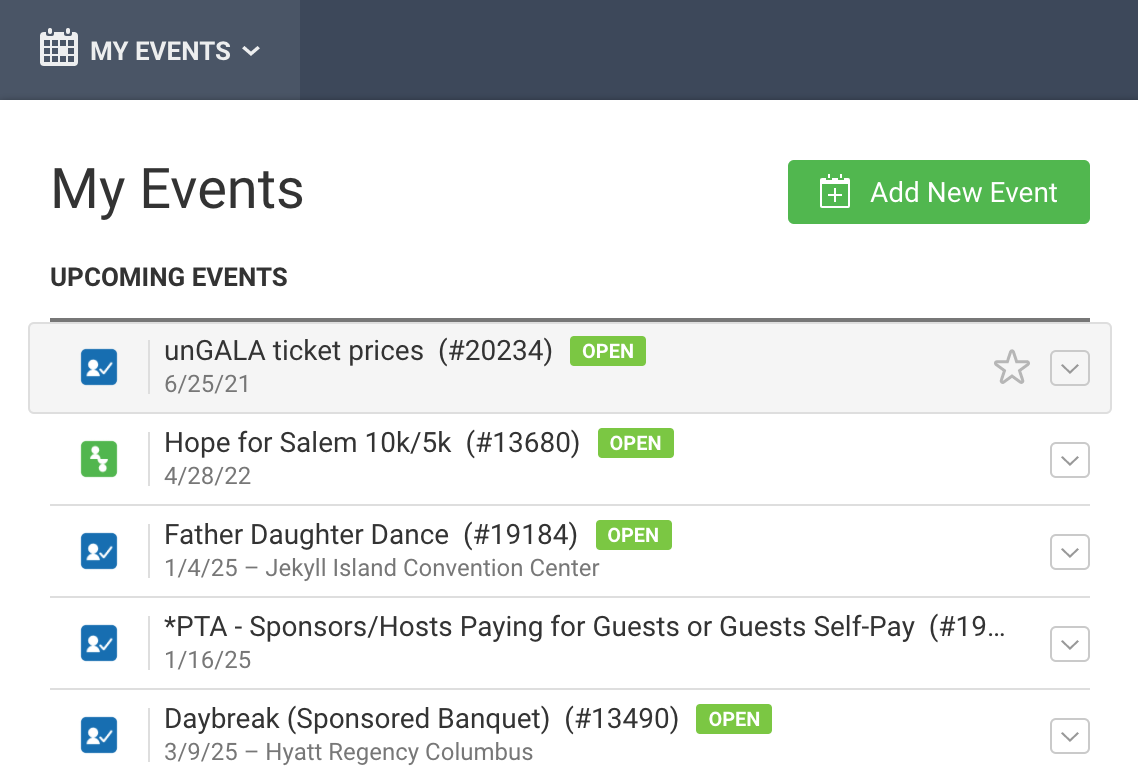
lists your upcoming events
and your past events by year
shows the Add New Event button
includes the RSS feed of our FundEasy blog updates.
To the right of each event on your Home page you'll find a chevron [v] button. You can click the button to quickly access your Event Tools Menu for that event. You can also click the name of the event to access your Event Dashboard.
Navigation Bar
Across the top of all your pages, you'll see the navigation bar.

Home - Click on the FundEasy logo to return to the home page.
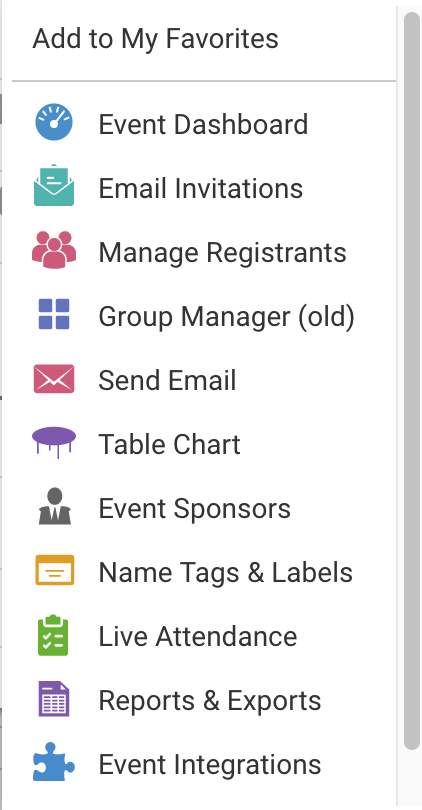
The My Events dropdown in the top left corner is an easy way to get to a list of all your events and switch between events even when you're not on your home page. You can add an event from this dropdown as well. Like the chevron [ V ] menu on your Home page, you can also find links in this [ V ] menu for your Event Dashboard, Event Setup, Manage Registrants, or View Invoice. If you have an event you are visiting frequently, click the star beside the chevron [ V ] button to Favorite the event and pin it to the top of your event list.
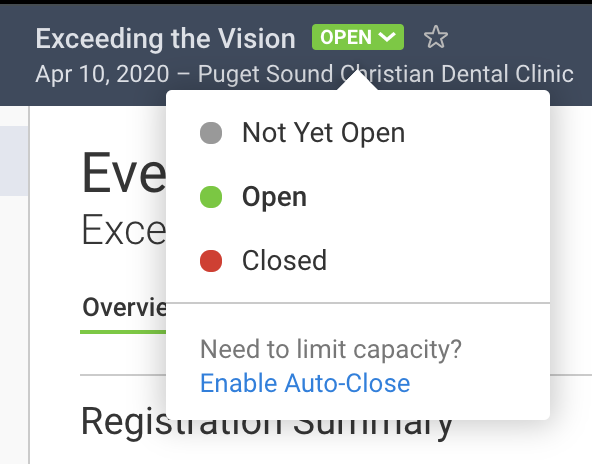
Open and Close your event from the status icon beside the name of the event that you are currently in. The dot in the dropdown shows you if your event is Not Yet Open (usually while you're setting up the event), Open (while your event is running and open to the public), or Closed (usually after your event is finished). You can click the indicator to switch the event's status.
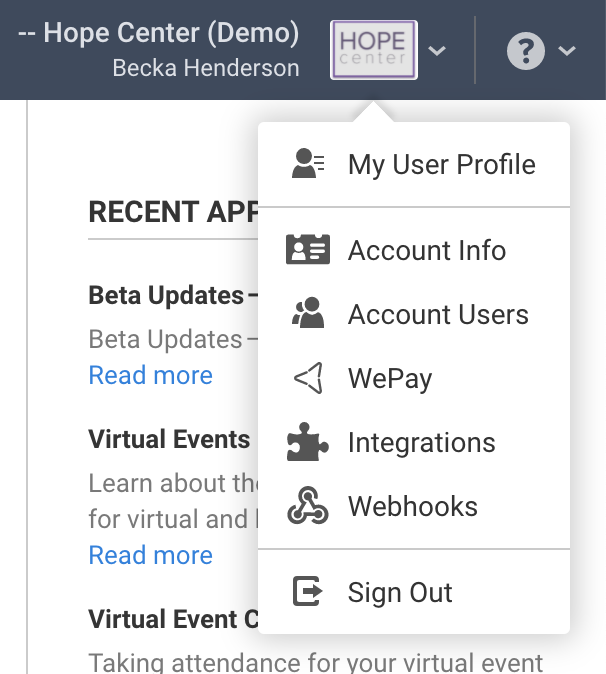
Click your organization logo in the top right corner to access your account level tools:
View/edit your User Profile
View/edit your Account Info (organization name, address, logo, etc.)
View Account Users and invite new users to the system (if you have the appropriate permission level)
Access WePay merchant account information if you previously used WePay with an event
Set up Integrations (to help you connect other software to your FundEasy account)
Create Webhooks (to create triggered notifications in FundEasy)
Sign Out
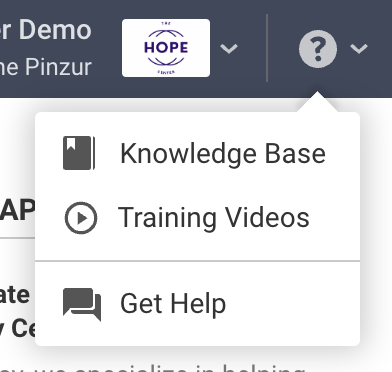
Access our Knowledge Base, view training videos, or get help from our Support Team by clicking the question mark in the top right corner .
Peer-to-Peer/Attendance Training Video: Admin Tools, Home Page, Top Toolbar
Read video transcript here.
Event Tools
Below the Navigation Bar are your event tools:
The Event Tools allow you to navigate to the Attendance or Peer-to-Peer tools within your event. To make it easier to navigate on a smaller screen, the Event Tools menu and the sub-panel that sometimes appears can collapse to show just the icons. You can expand or collapse sidebar menus by clicking the white space or chevrons (<<) near the bottom of the column.
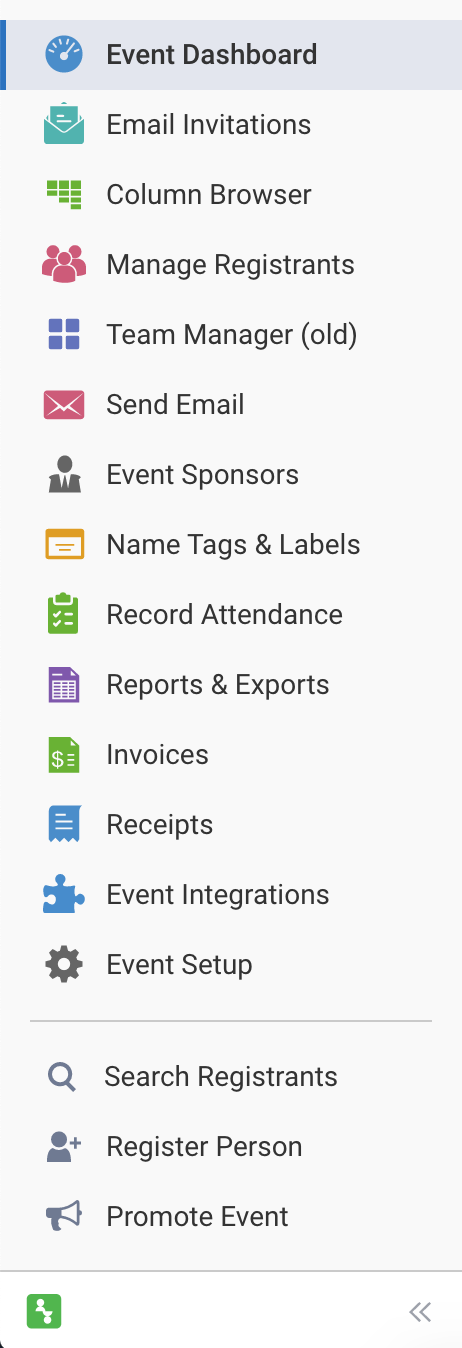
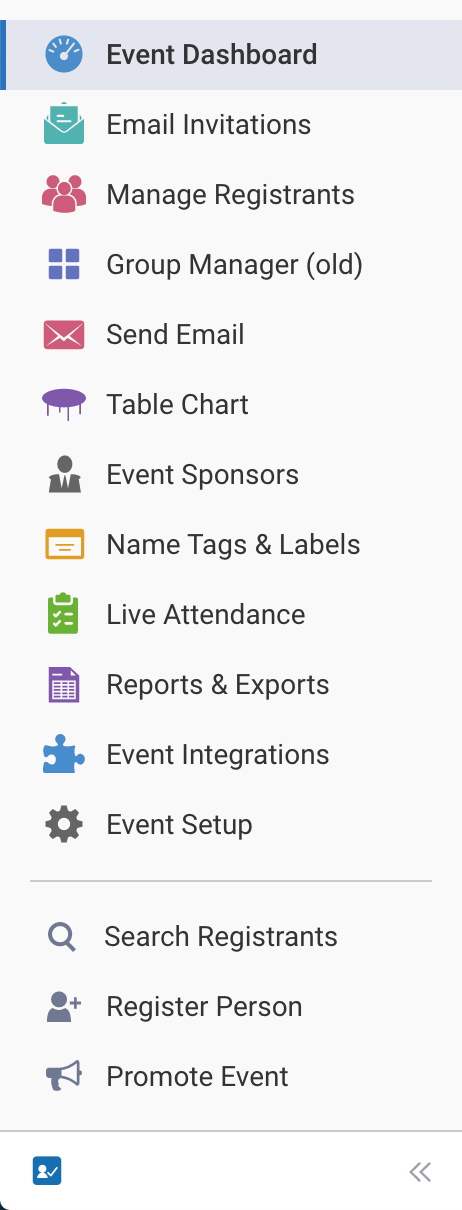
Here's a walk-through of most of the tools in the navigation panel:
The first tool in the navigation panel is your Dashboard, which gives you quick stats on your event. Scroll down to the Promote Your Event section to copy your event link (or click the Promote Event button in the bottom left corner).
To learn more about the Dashboard, check out this Knowledge Base article: The Dashboard
The Email Invitation List tool allows you to add people who you want to send Registration Invitation Emails to - just click the Add Person button in the top right corner. You can either add people individually or by uploading a CSV file. You can then send and re-send invitations by checking the boxes beside people's names and clicking the green Send New Invitation Email button in the top right corner.
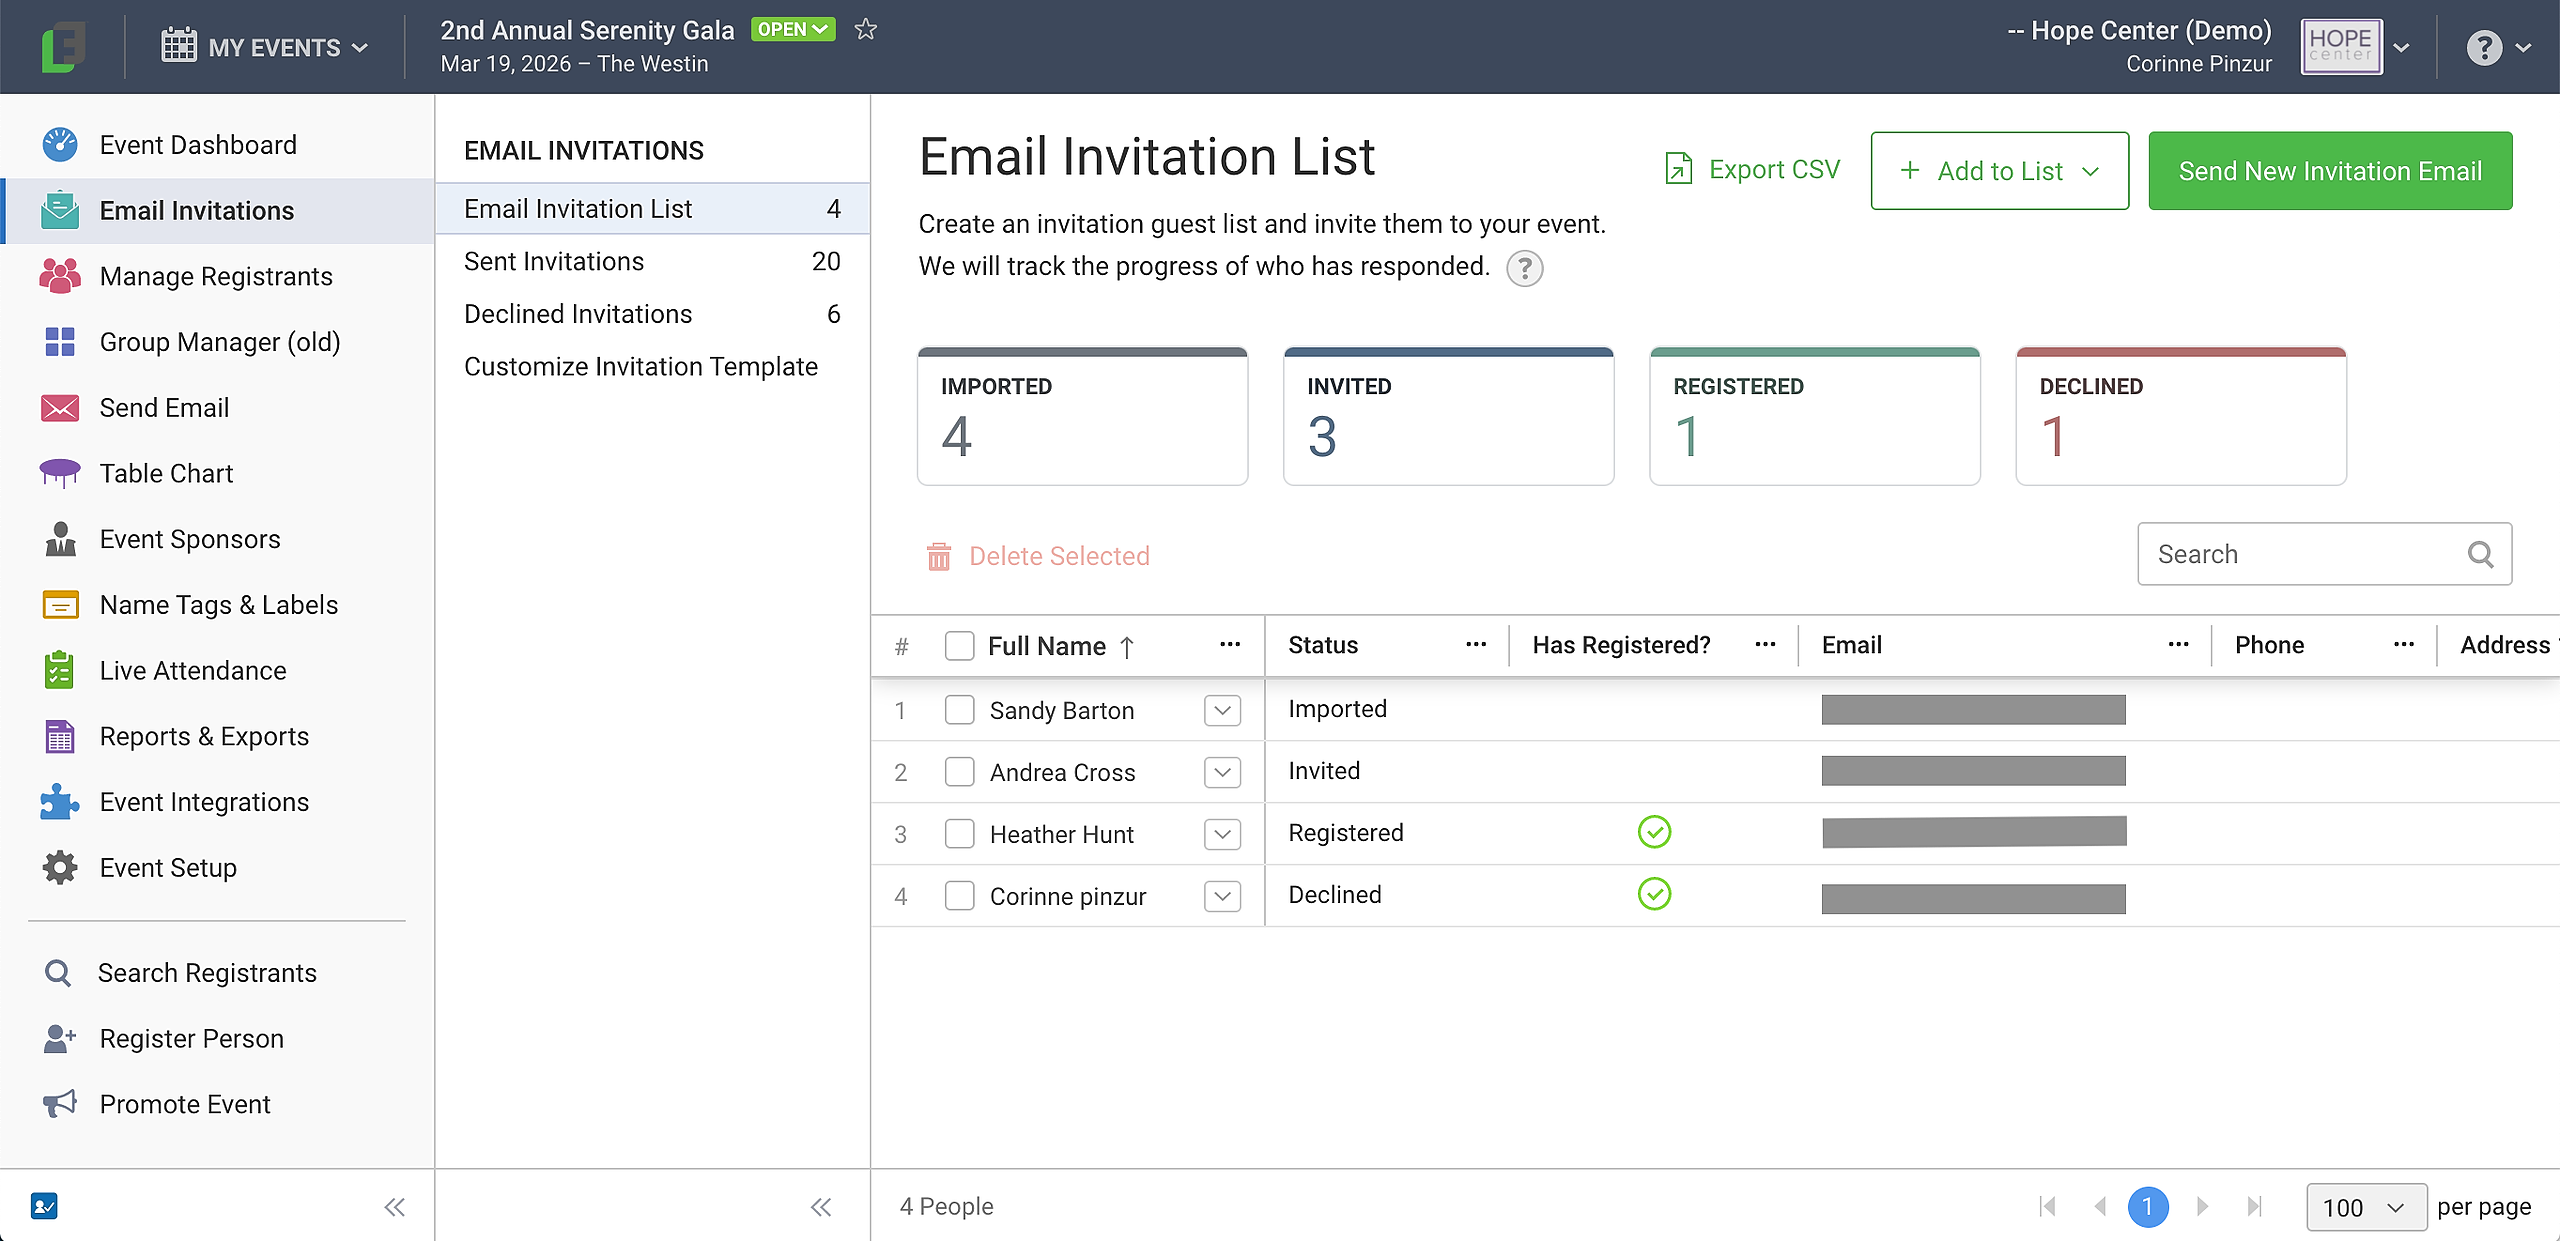
To learn more about sending invitations, check out this Knowledge Base article: Sending Invitations
In Peer-to-Peer, the Column Browser tool shows all of your liaisons (if using), participants, and donors. The layout is similar to the old version of FundEasy.
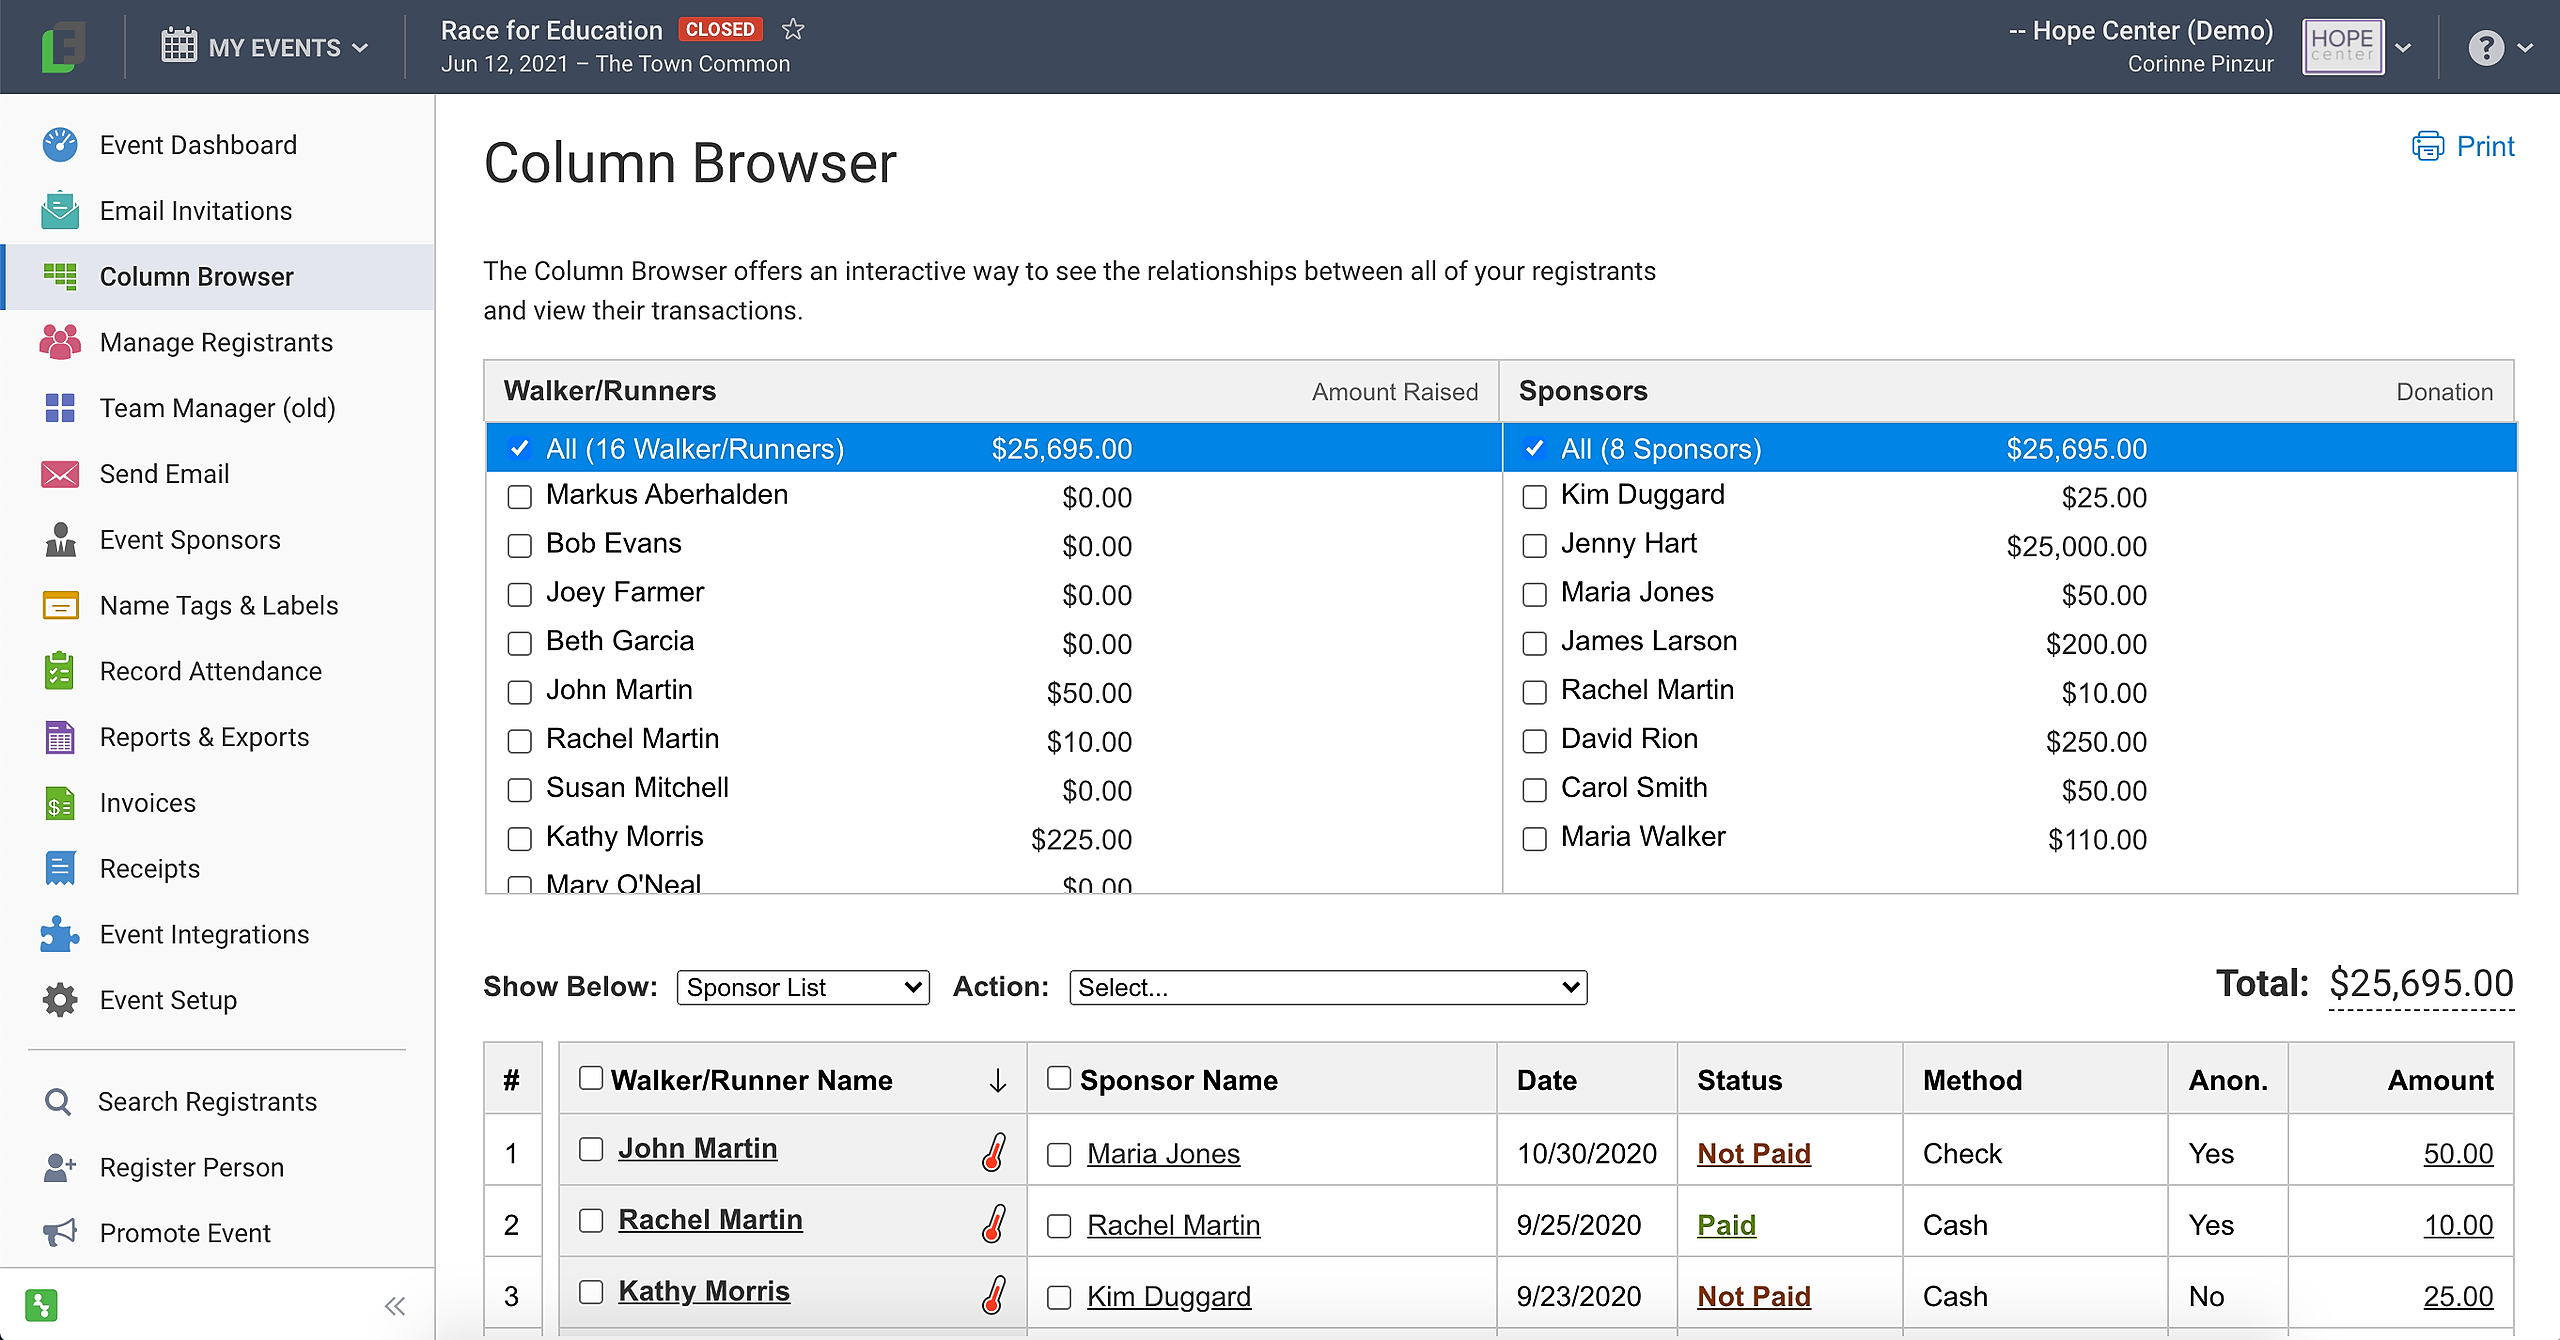
To learn more about the Column Browser, check out this Knowledge Base article: Column Browser - Peer-to-Peer
The Manage Registrants tool has lots of helpful features!
View your groups/teams by clicking them in the Groups/Teams list on the left.
The Options link in the top right corner of each group/team lets you edit the group/team.
The down arrow to the right of each registrant allows you to view the person's profile, promote them to a group host/team captain, manage seat requests and parties (in Attendance), view the registrant's fundraising page (in Peer-to-Peer), cancel or delete registrations, and more!
To move a registrant from one group/team to another, simply drag and drop!
In Attendance, hover over a registrant and click the "Party of" icon to the right of the registrant's name to edit the registrant's party.
Also in Attendance, clicking the chair icon to the right of a registrant's name allows you to edit, fulfill, or delete the registrant's seat request.
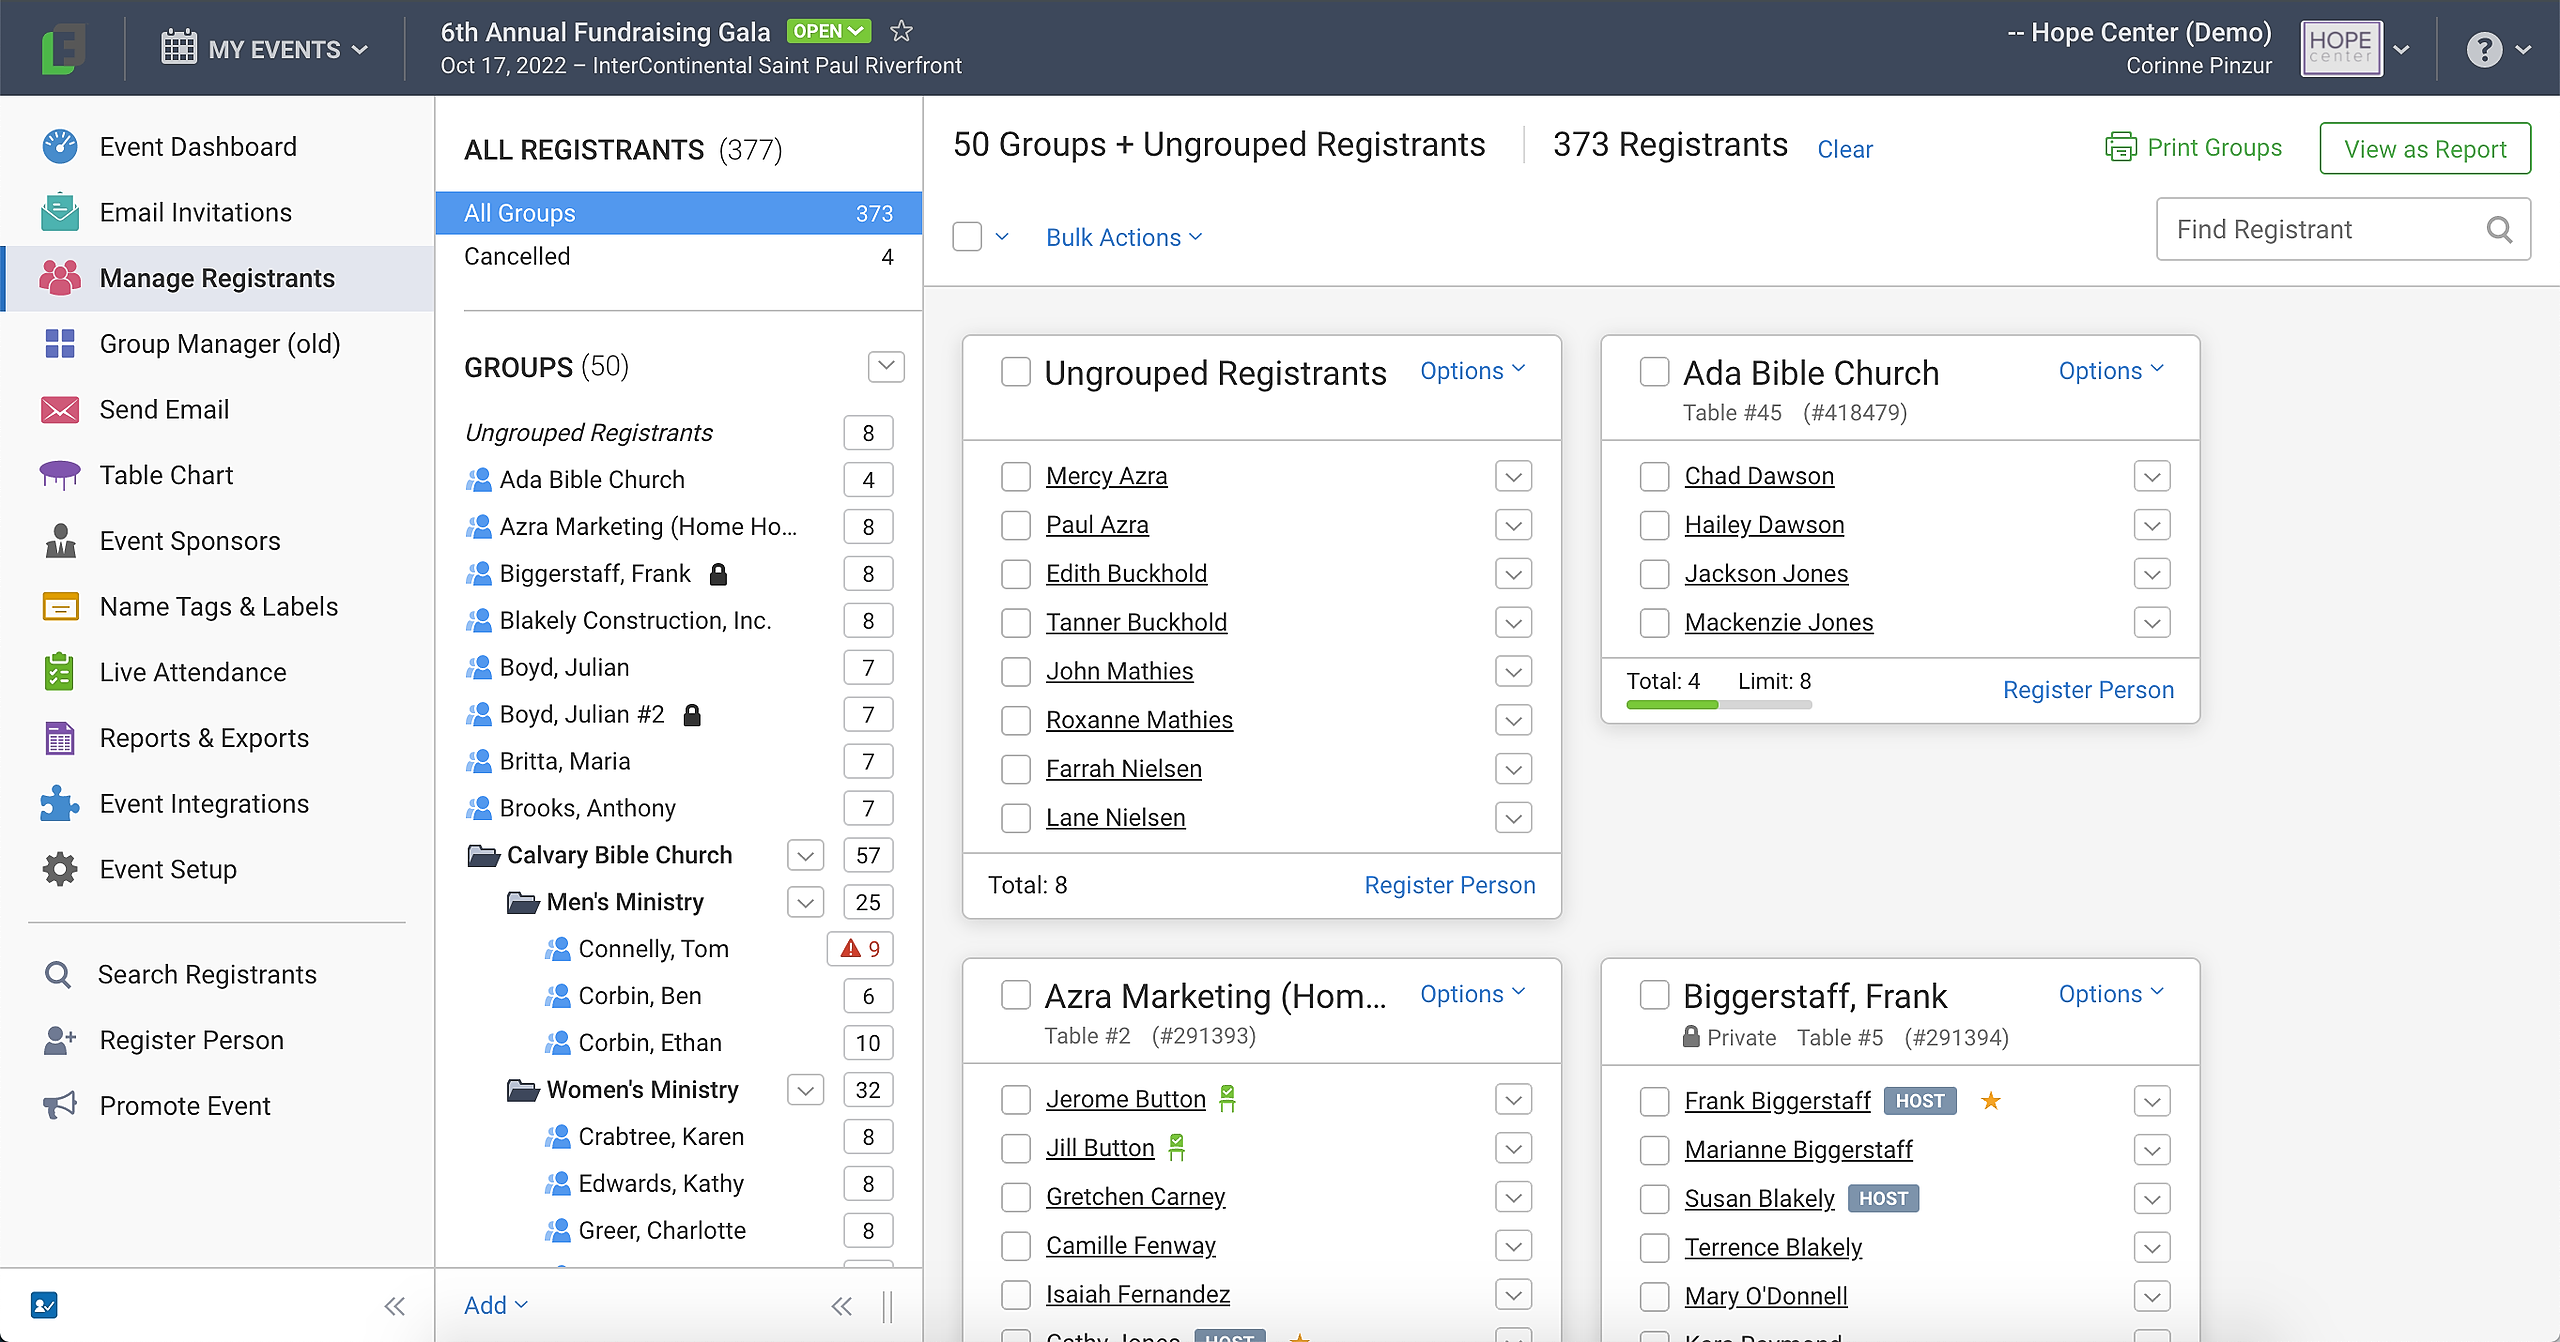
To learn more about the Manage Registrants tool, check out these Knowledge Base articles: Manage Registrants - Attendance and Manage Registrants - Peer-to-Peer
The Send Email tool lets you compose new emails to your registrants, view sent emails, save drafts, and even schedule emails to be sent at a later date/time.
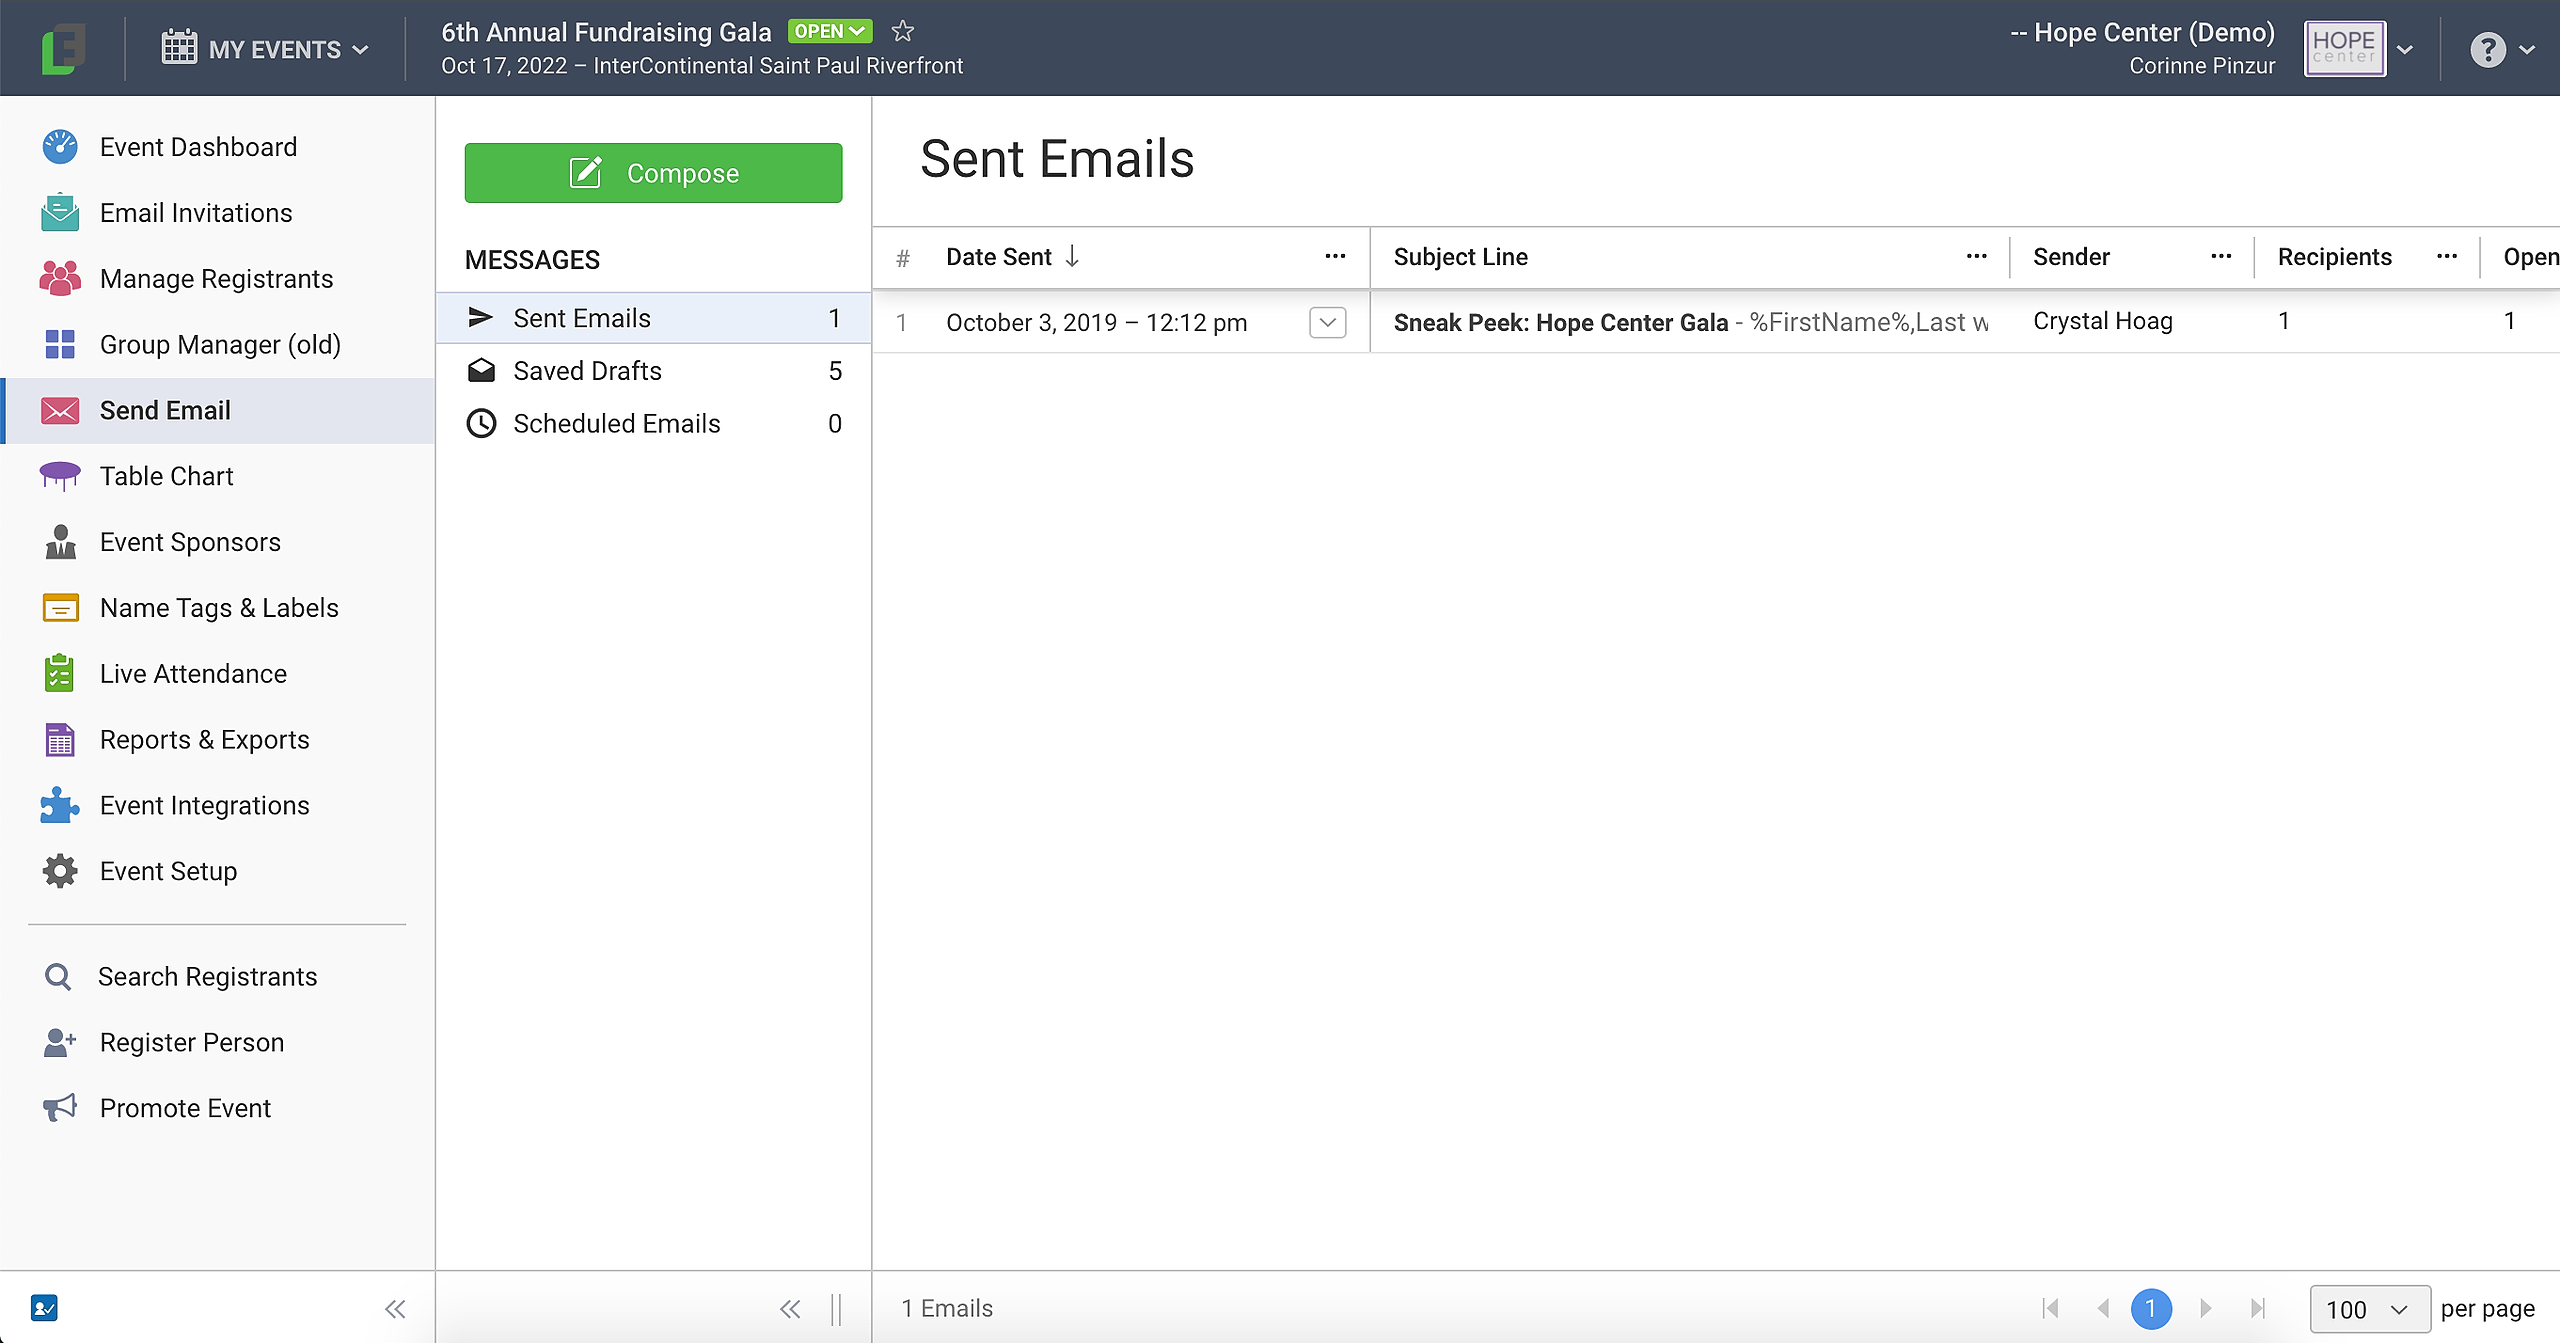
To learn more about sending emails, check out this Knowledge Base article: Sending Emails
In Attendance, the Table Chart tool (for in-person and hybrid events only) is the same as in the old version of FundEasy. To learn more, check out this Knowledge Base article: Table Charts
The Event Sponsors tool allows you to add Event Sponsors by clicking the blue Add Event Sponsor button in the top right corner. You can also reorder them by dragging and dropping. To manage an Event Sponsor's transaction, click the dollar amount to open the Transaction Log. You can also see impressions and clicks for each Event Sponsor.
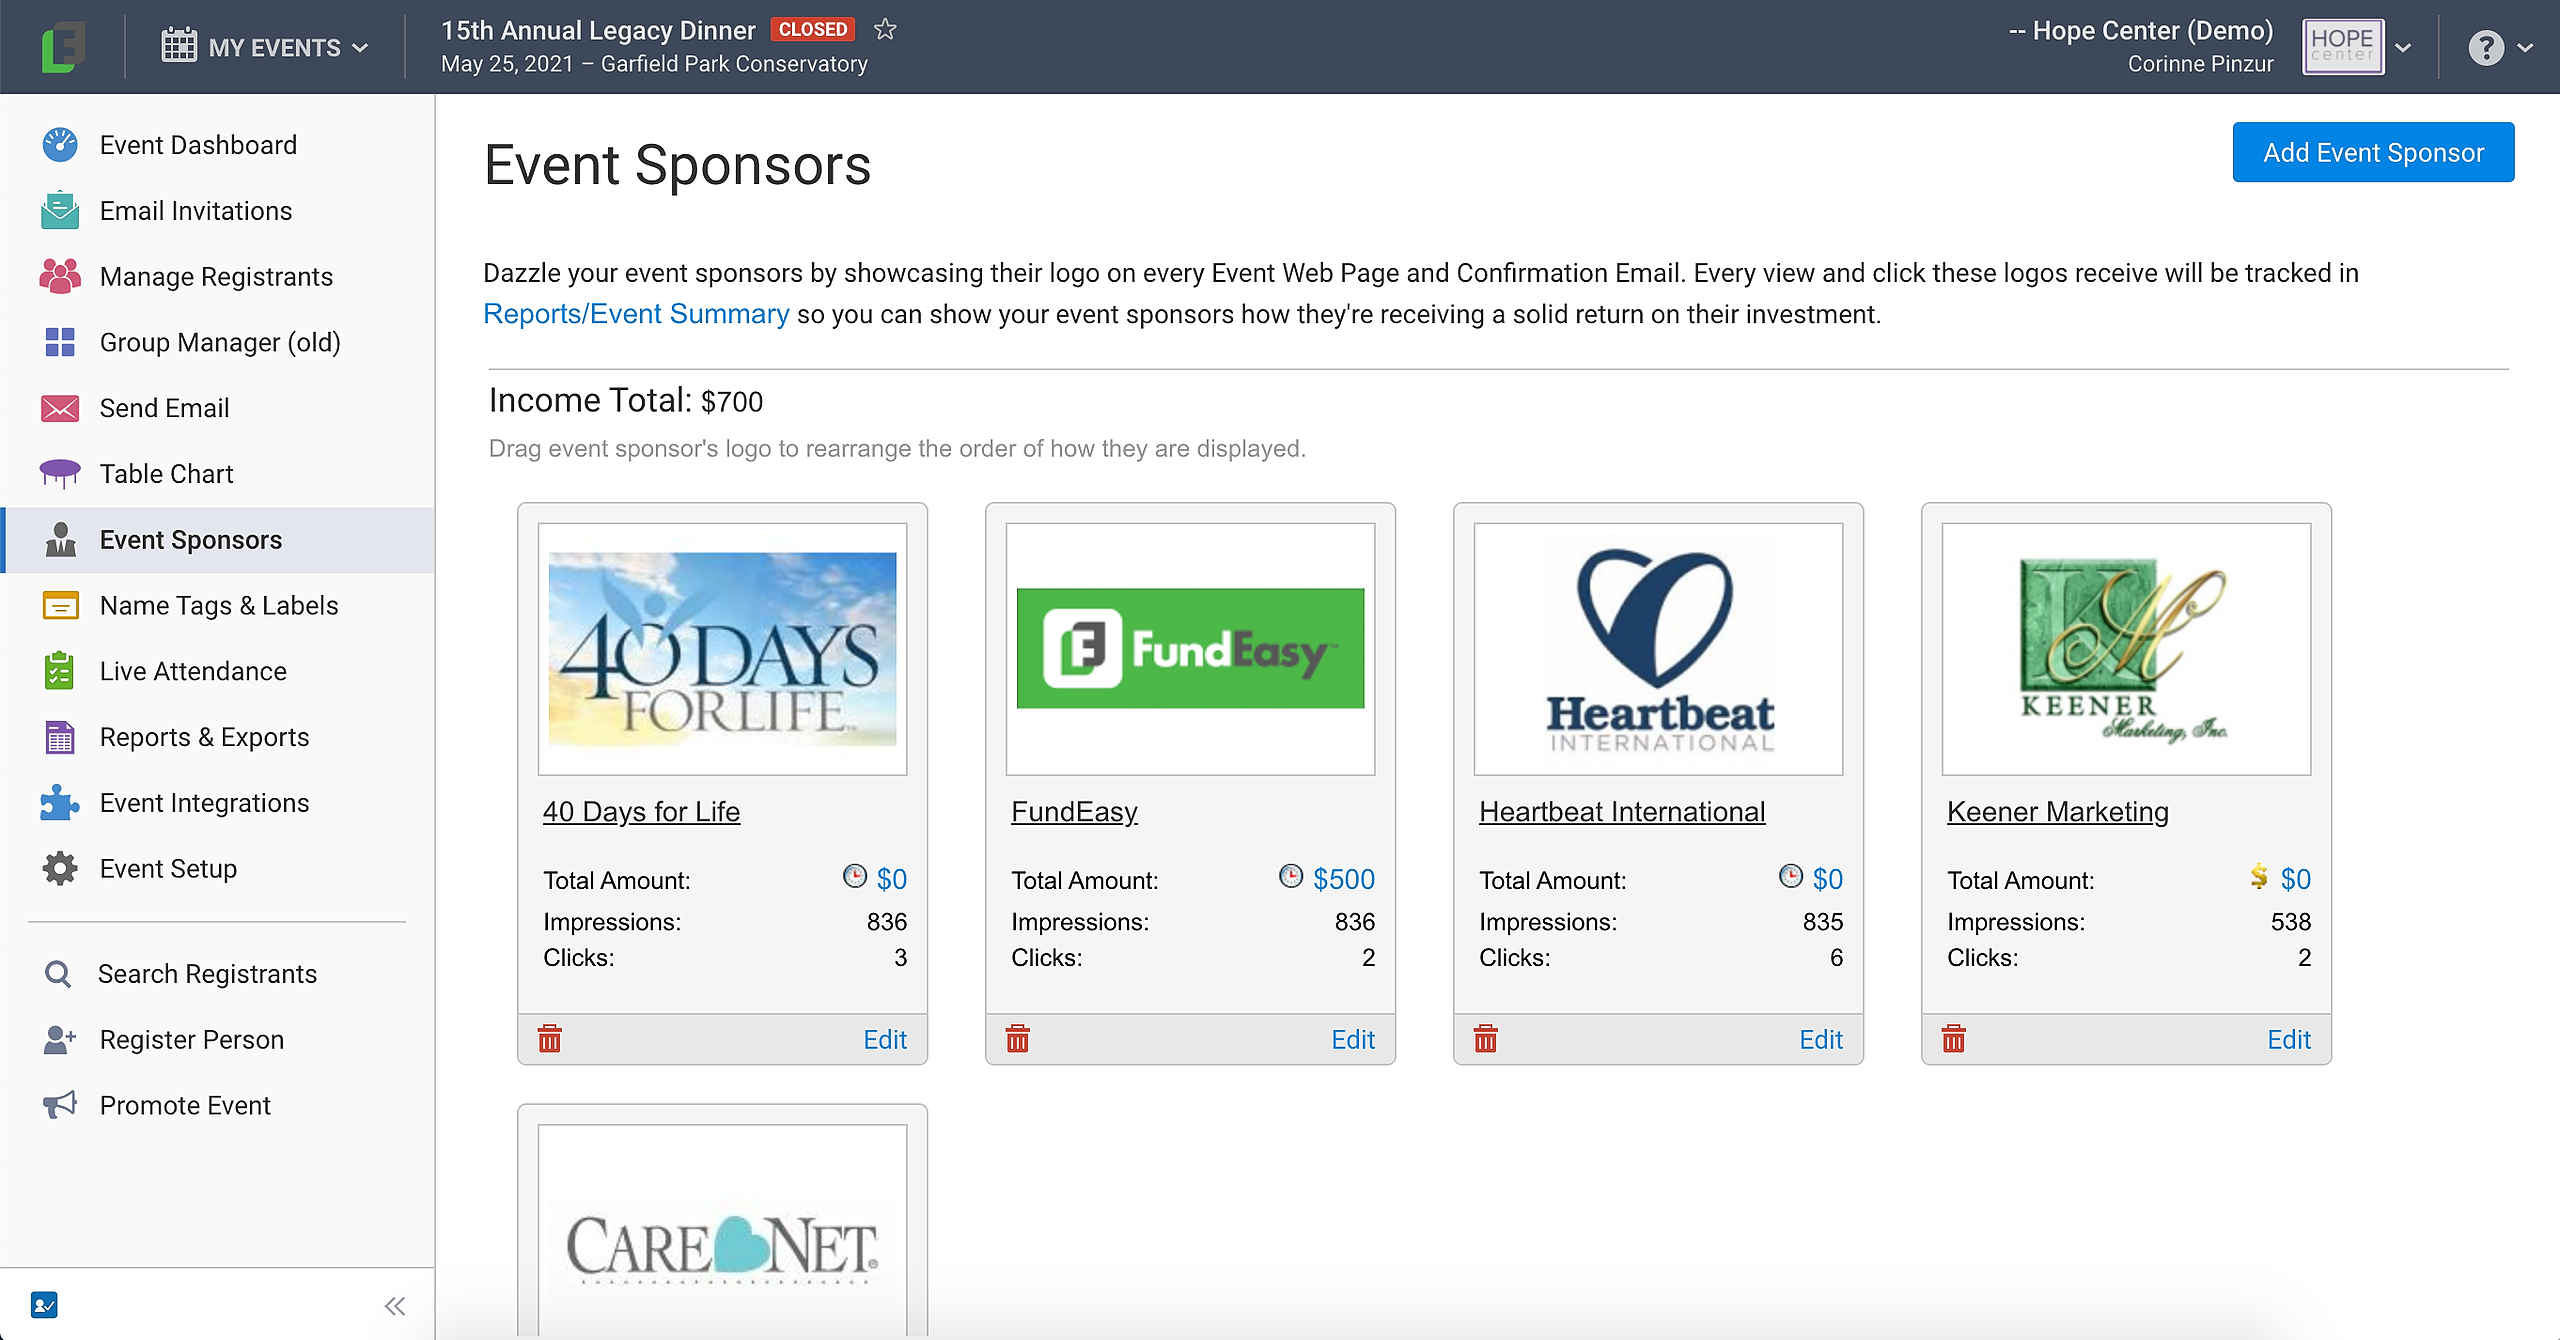
To learn more about the Event Sponsors tool, check out this Knowledge Base article: Event (Corporate) Sponsors
The Name Tags & Labels tool is the same as in the old version of FundEasy. To learn more, check out these Knowledge Base articles: Labels and Name Tags
In Attendance, the Record Attendance page gives you more information about Live Check-In and lets you place your order. To learn more about Live Check-In, check out these Knowledge Base articles: Live Check-In
Reports & Exports gives you a few handy pre-created reports on the left, as well as the Custom Report Builder that lets you create and save your own custom reports.
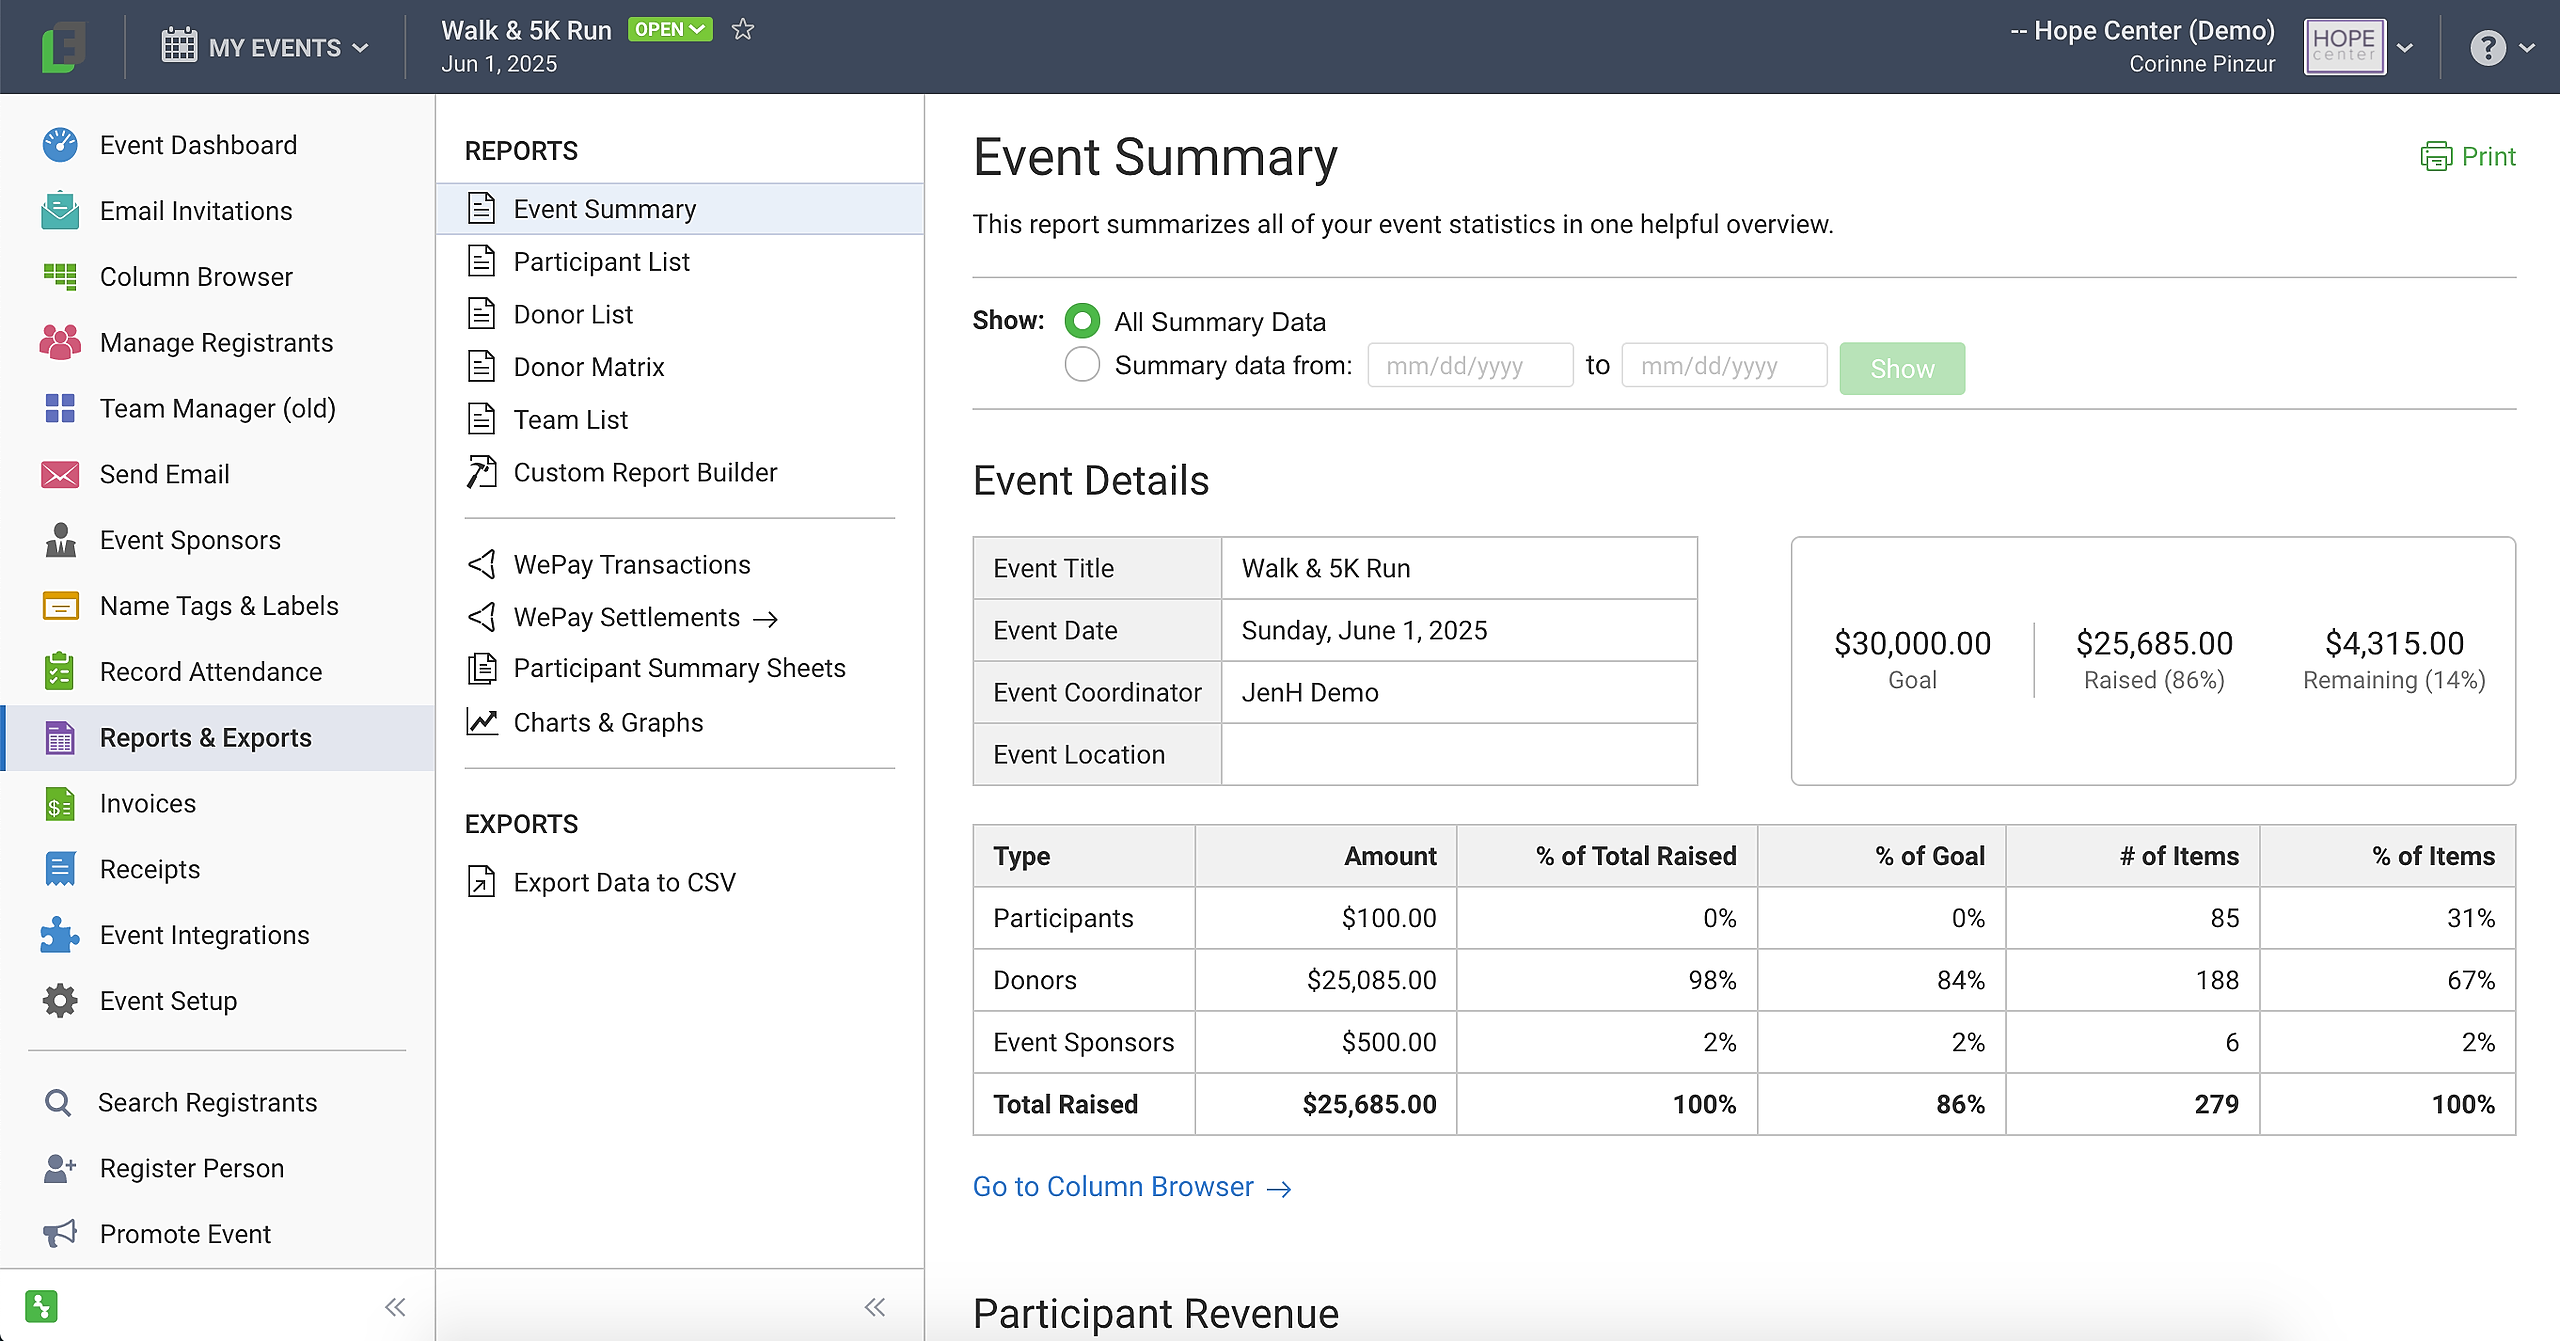
To learn more about Reports & Exports, check out these Knowledge Base articles: Attendance Reports & Exports Overview and Peer-to-Peer Reports & Exports Overview
Peer-to-Peer includes the Invoices and Receipts tools so you can print those for your participants/donors/event sponsors. To learn more, check out this Knowledge Base article: Invoices and Receipts in Peer-to-Peer
The Integrations tool allows you to set up integrations between FundEasy and several other platforms
The Event Setup wizard is a handy tool to walk you through the process of getting your event set up and ready to open to the public!
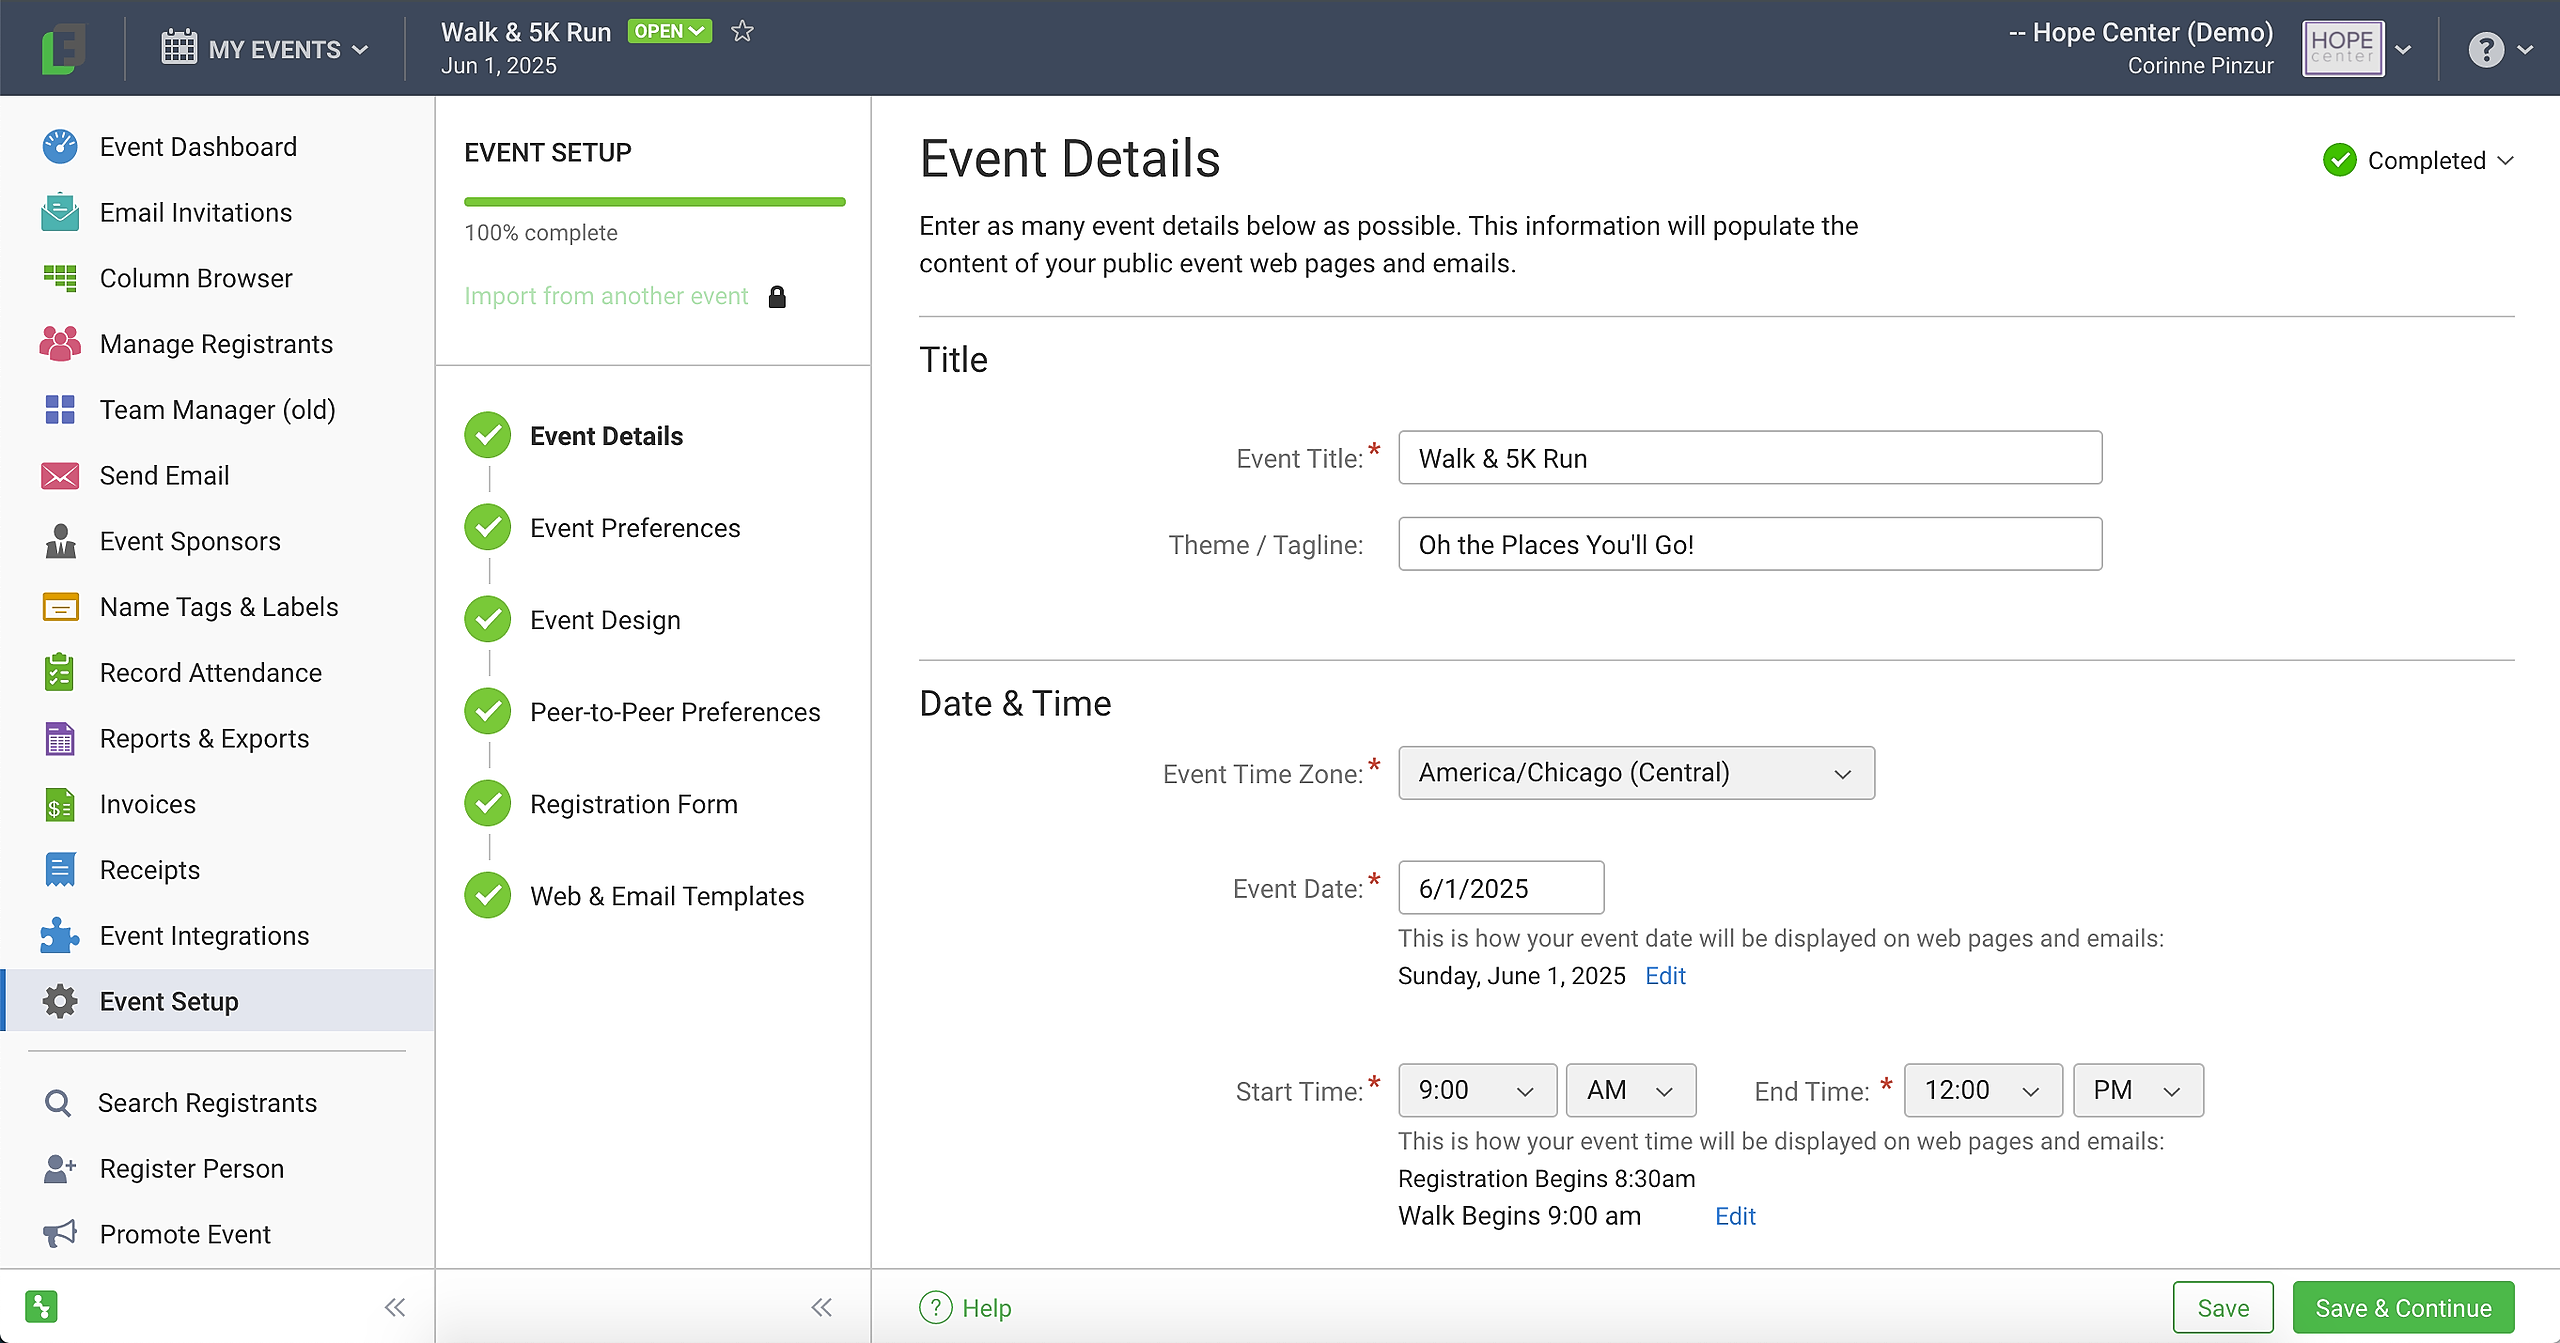
The first step is to fill out your Event Details (event title, date/time, location, event description, etc.).
The second step is to define some Event Preferences (for example, whether to send registration confirmation/decline emails or whether to notify the event coordinator when someone registers).
The third step is to upload your event's banners in Event Design (or request banner graphics to be designed for you) and choose your theme, colors, and fonts.
The fourth step in Peer-to-Peer is Peer-to-Peer Preferences, which allows you to adjust the settings on your public-facing web pages, such as the Event Web Page, fundraising pages, and Donation Page.
The fourth step in Attendance and the fifth step in Peer-to-Peer is to review your Registration Form. You can click the Options button in the top right corner and choose Edit Form Fields if you'd like to make changes, or you can contact our Support Team who can help with customizing your form!
The fifth step in Attendance and the sixth step in Peer-to-Peer is to review your Web & Email Templates (the web pages and emails associated with your event). Click on a Template to preview it and click the Edit Template button in the top right corner if you'd like to make changes. If you'll be doing a virtual or hybrid event, the Express Self Check-In Page allows you to set up a landing page for your event video or livestream and include your give buttons as well.
After each step, click Save at the bottom of the page to save your progress or click Save & Continue to mark that step as complete and move on to the next one.
Note: You can also import data and many of these settings from a past event by clicking the green link above the setup steps that says "Import from another event."

To learn more about Event Setup, check out this Knowledge Base article: Event Setup
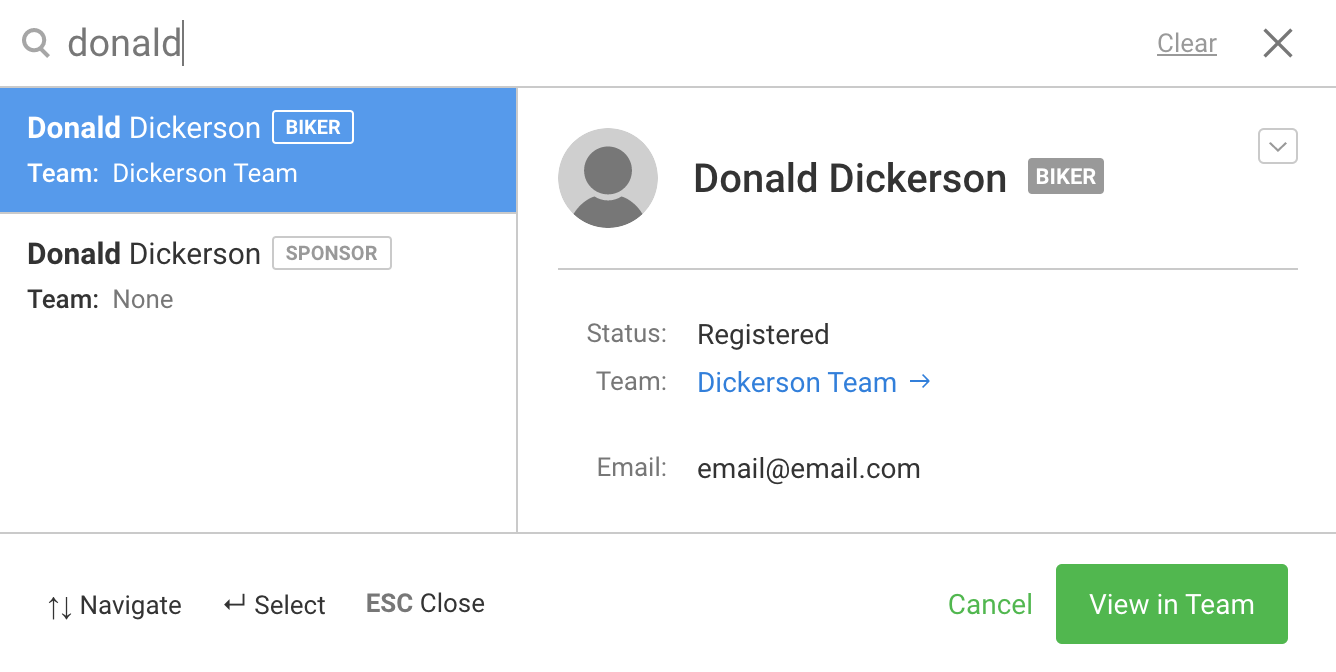
The Search Registrants button in the bottom left corner of your event allows you to look up registrants in your events.

Click the chevron [v] to the right of their name to open their profile, go straight to their group or team, or go to the Custom Report Builder.
The Register Person button lets you register guests and hosts in Attendance and participants, sponsors, and liaisons in Peer-to-Peer from anywhere in the app without losing your place.

To learn more about registering people from the backend, check out this Knowledge Base article: Registering people to your event
Finally, the Promote Event button allows you to copy your Event Web Page link to use on your website or use the social media buttons to post the event online.

For videos about FundEasy's tools, check out our Attendance Walk-Through videos and our Peer-to-Peer Walk Through videos.