Video overview
Create livestream page on YouTube, Facebook, or other platform
Create landing page in FundEasy
Create email to give registrants access to landing page
Reports
In order to know who checked into your event, you can use Express Self Check-In. Here's a quick overview of the check-in process:
Create your livestream page on YouTube or Facebook, or your platform of choice.
Create your landing page (the Express Self Check-In Page) in FundEasy.
Create the email you'll use to announce the start of your event.
When you're ready to start, send the email (or you can schedule the email to be sent at a certain time).
For in-person events or for events created before the new virtual/hybrid/in-person event types were released, your guests will receive the email and click the link to view the Express Self Check-In Page.
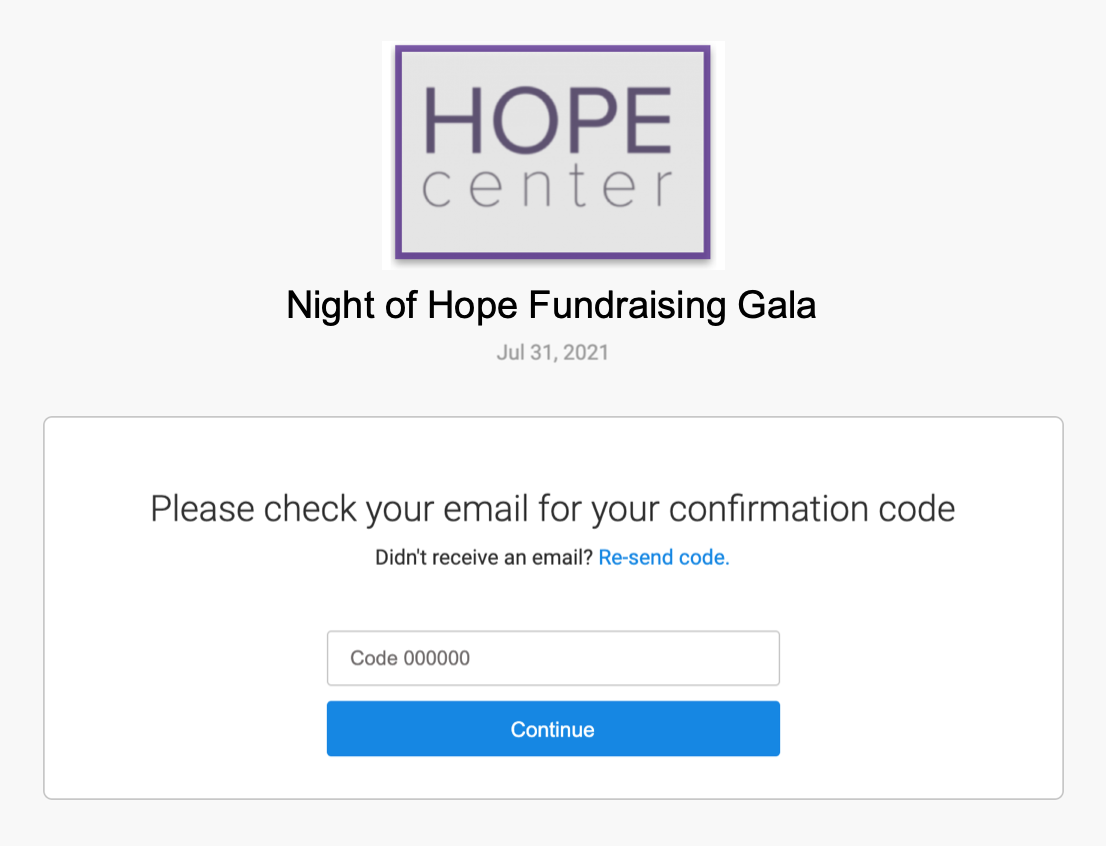
For events created with the new virtual or hybrid event types, the link will prompt them to enter the email address they registered with. Entering their email address will send them an automatic email with a confirmation code.
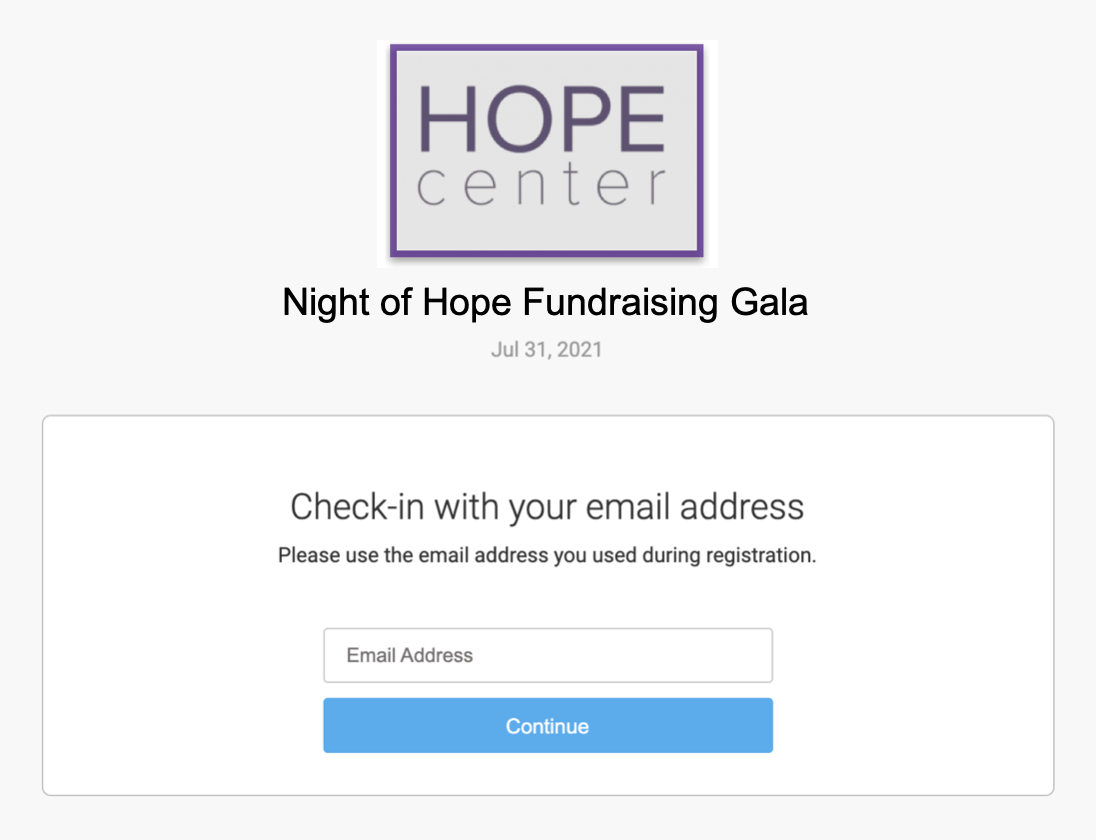
Guests can then enter the confirmation code they receive via email.
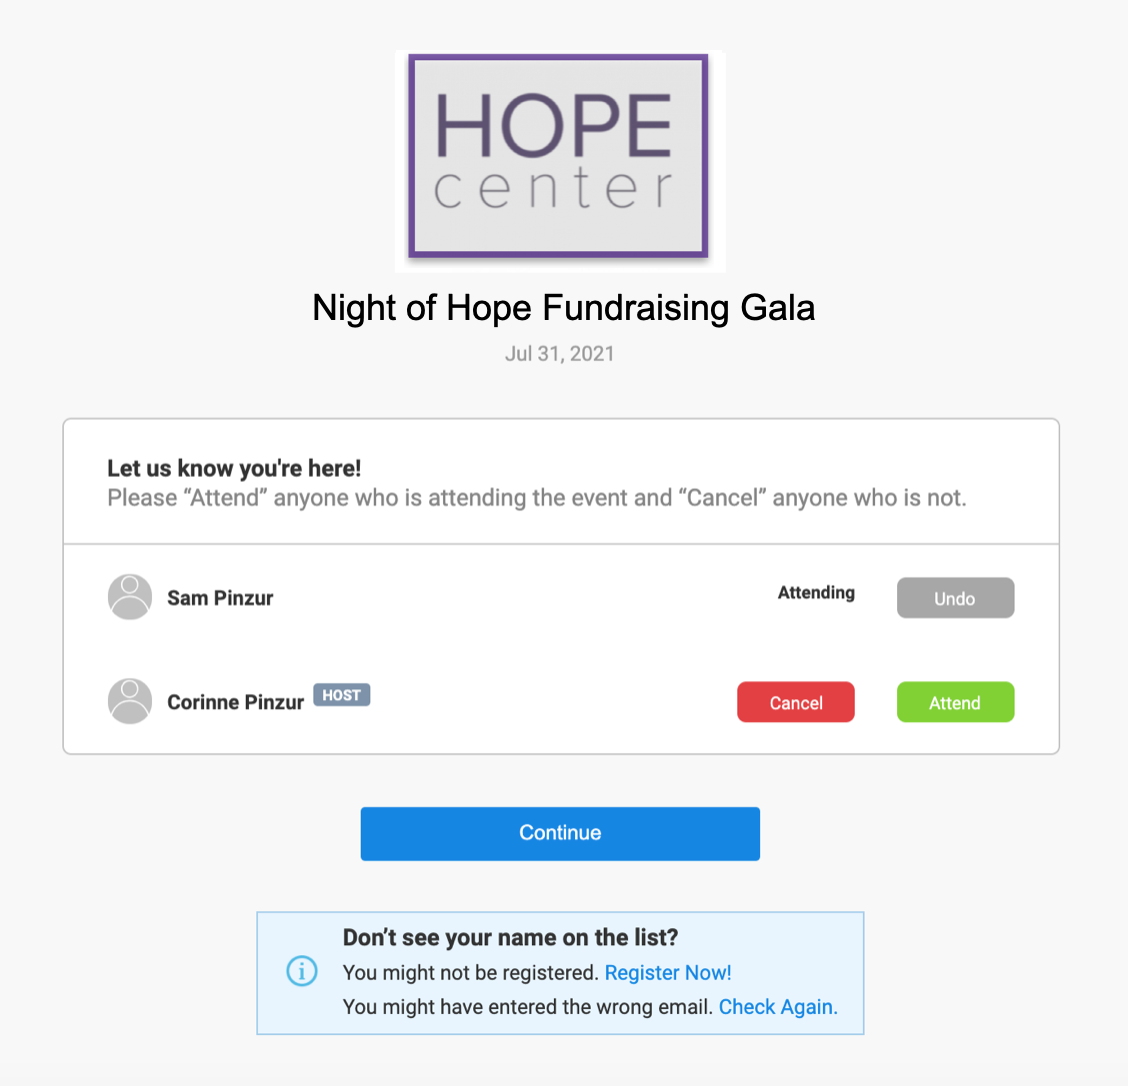
If the guest is not in a party, they will be taken straight to the Express Self Check-In Page upon entering the correct confirmation code. If they are in a party with other guests, they can choose to check in others in their party and then click Continue to view the Express Self Check-In Page. They are now checked-in to the event.
Your guests can watch the livestream from the Express Self Check-In Page, or they can click a link to go to the livestream page on your social media site.
Here's a video overview:
Use Express Self Check-in for your Virtual Event Video
(Read video transcript here.)
Create Your Livestream Page
First, create your livestream page on YouTube, Facebook or another live streaming platform.
If you're using YouTube to stream your pre-recorded video it's best to schedule that as a Premiere. More info on Premieres in this article.
If you're using Facebook, you can refer to their help pages.
If you're using Zoom, you'll follow their setup instructions.
Note: We do not offer support for 3rd party software.
Create Your Landing Page
Next, you'll create your Express Self Check-In landing page in FundEasy. You'll need to do this from the new version of FundEasy.
Choose your event and click the gear icon to enter Event Setup.
Choose Web and Email Templates.
Select the Express Self Checkin Page Template.

Click Edit Template in the upper right corner.
In Edit Template, you can make these changes (click here to see how some organizations have set up this page).
Add a Web Page Title.
Add a welcome message.
For in-person events or for events created before the new virtual/hybrid/in-person event types were released:
(Click here for events created with the new virtual or hybrid event types.)
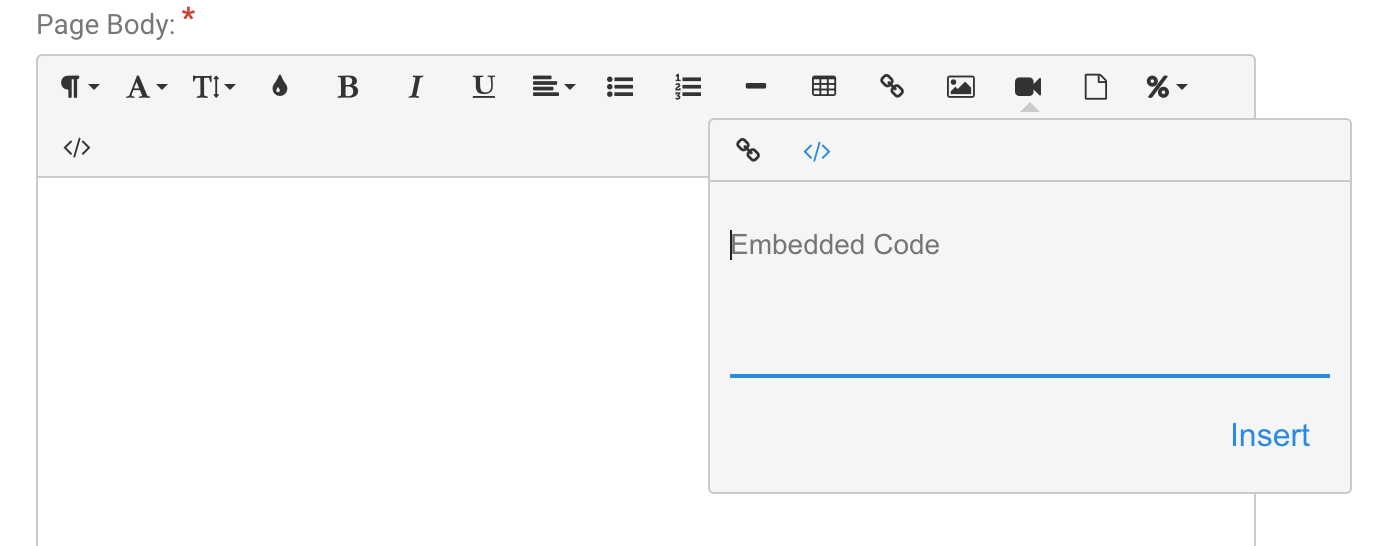
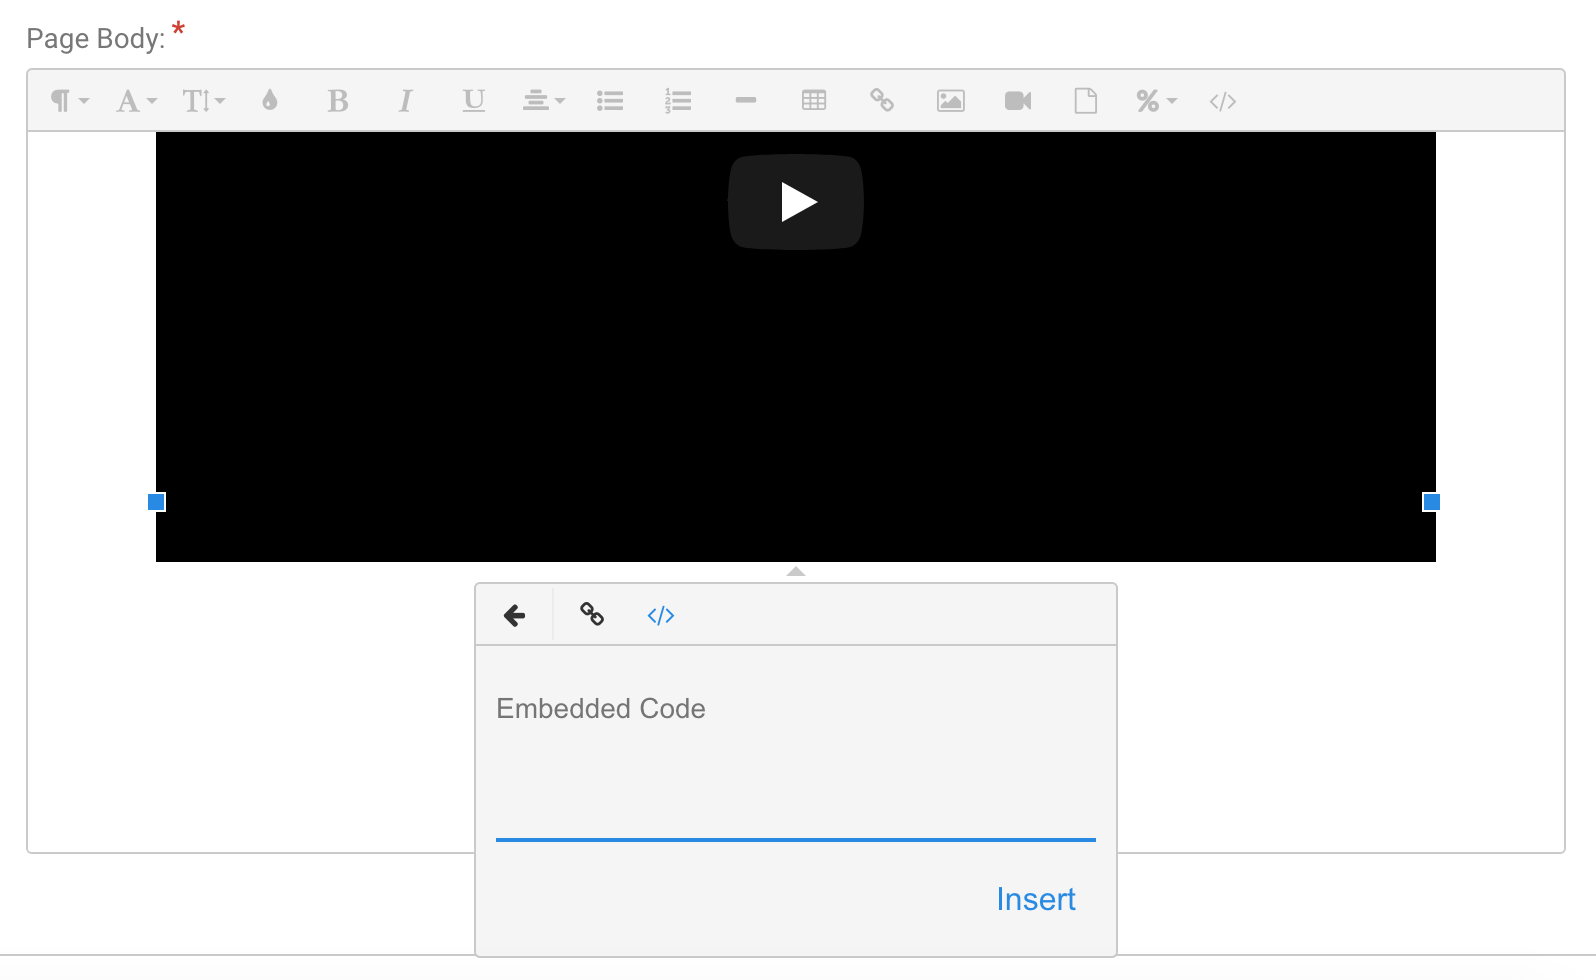
Option 1 - Show the video on the Express Self Check-In Page:Click the video icon in the toolbar. Videos automatically have the options to view on the video's website (like YouTube or Vimeo) disabled.
Add the link to your video from YouTube or Vimeo.
Or add the embed code from YouTube or Vimeo.
To add the link to your Facebook, click the link icon and add the link.
Note: Facebook livestream windows cannot be embedded into this template.
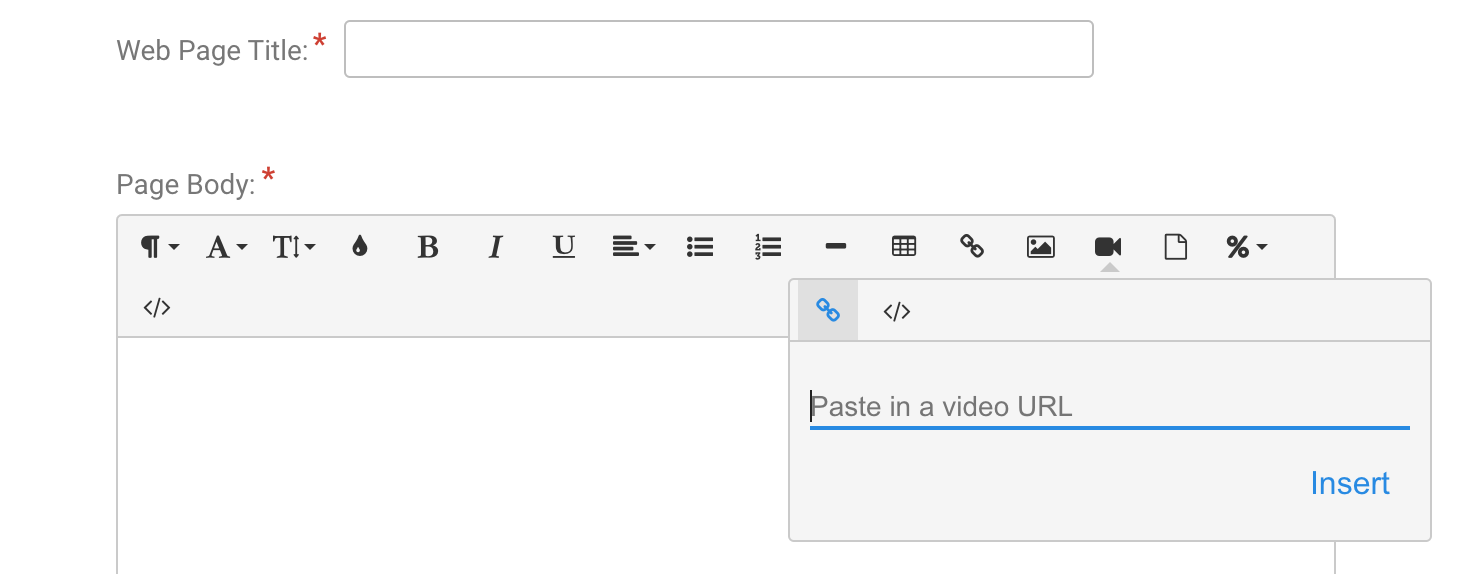
Option 2 - Redirect your guests to the video stream page:
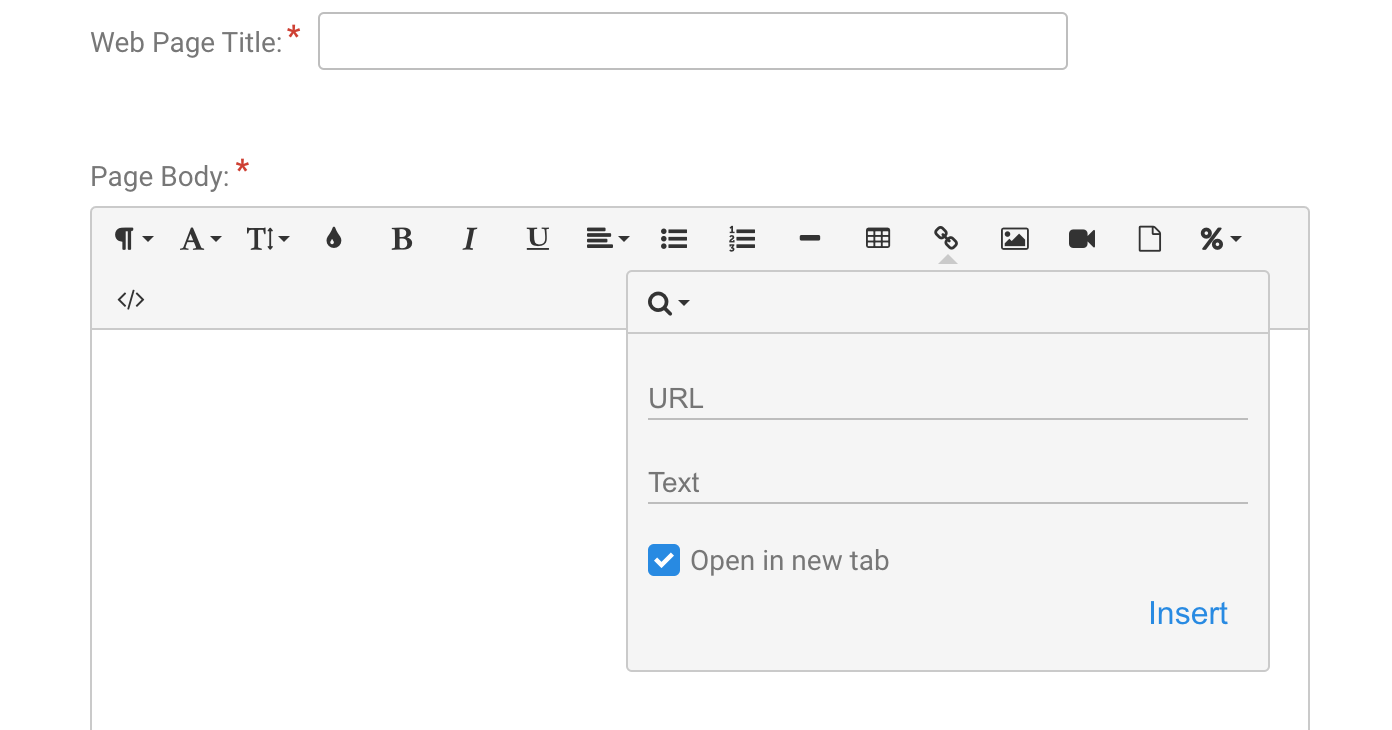
Add a link to the video stream page (such as YouTube or Vimeo) by clicking the link button and adding the URL and the Text they will click.
Or add an image by clicking the image icon, and then add a link to the image.For either link or image, choose "Open in a new tab" so the video will show in a different tab and guests won't navigate away from the Express Self Check-In window when they click the link.
You can even use this to put a Zoom link and log-in information. It's secure because this page is only available via an email that you send.
Add a Give button
Consider adding a donate link to the Express Self Check-In Page so your attendees can make a donation:
Click the image icon in the toolbar at the top of the Page Body field to insert an image. Here is a button image you can use:

Once you add the Give button image, click the image and click the Insert Link icon in the toolbar that appears.
Enter your giving site's URL, check the "Open in a new tab" checkbox, and click Insert.
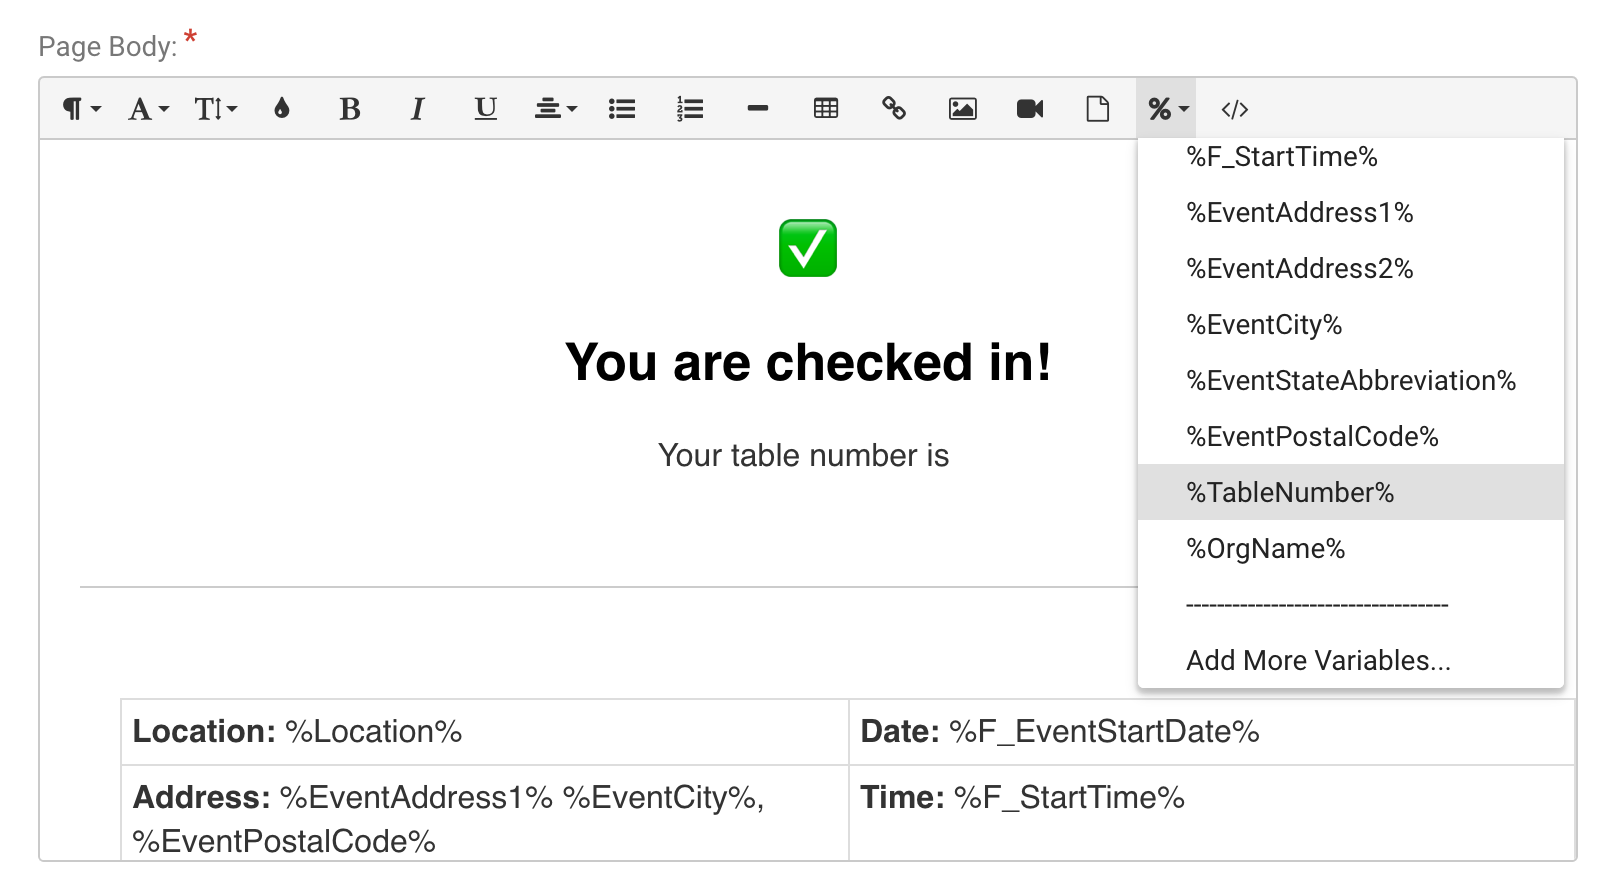
Add the table number
(optional)
For in-person events, if you'd like to include the guest's table number:
Click the Variables (%) icon in the toolbar at the top of the Page Body field.
If the %TableNumber% variable is not in the dropdown list, click the Add More Variables... option at the bottom of the dropdown, check the Table Number option in the popup window that appears, and click the Add Variables button at the bottom of the popup window.
In the Variables icon in the toolbar, choose the %TableNumber% variable.
Note: For in-person events created with the new in-person event type, the Express Self Check-In Page also includes the event location, date/time, and a map.
For events created with the new virtual or hybrid event types:
Option 1 - Show the video on the Express Self Check-In Page:
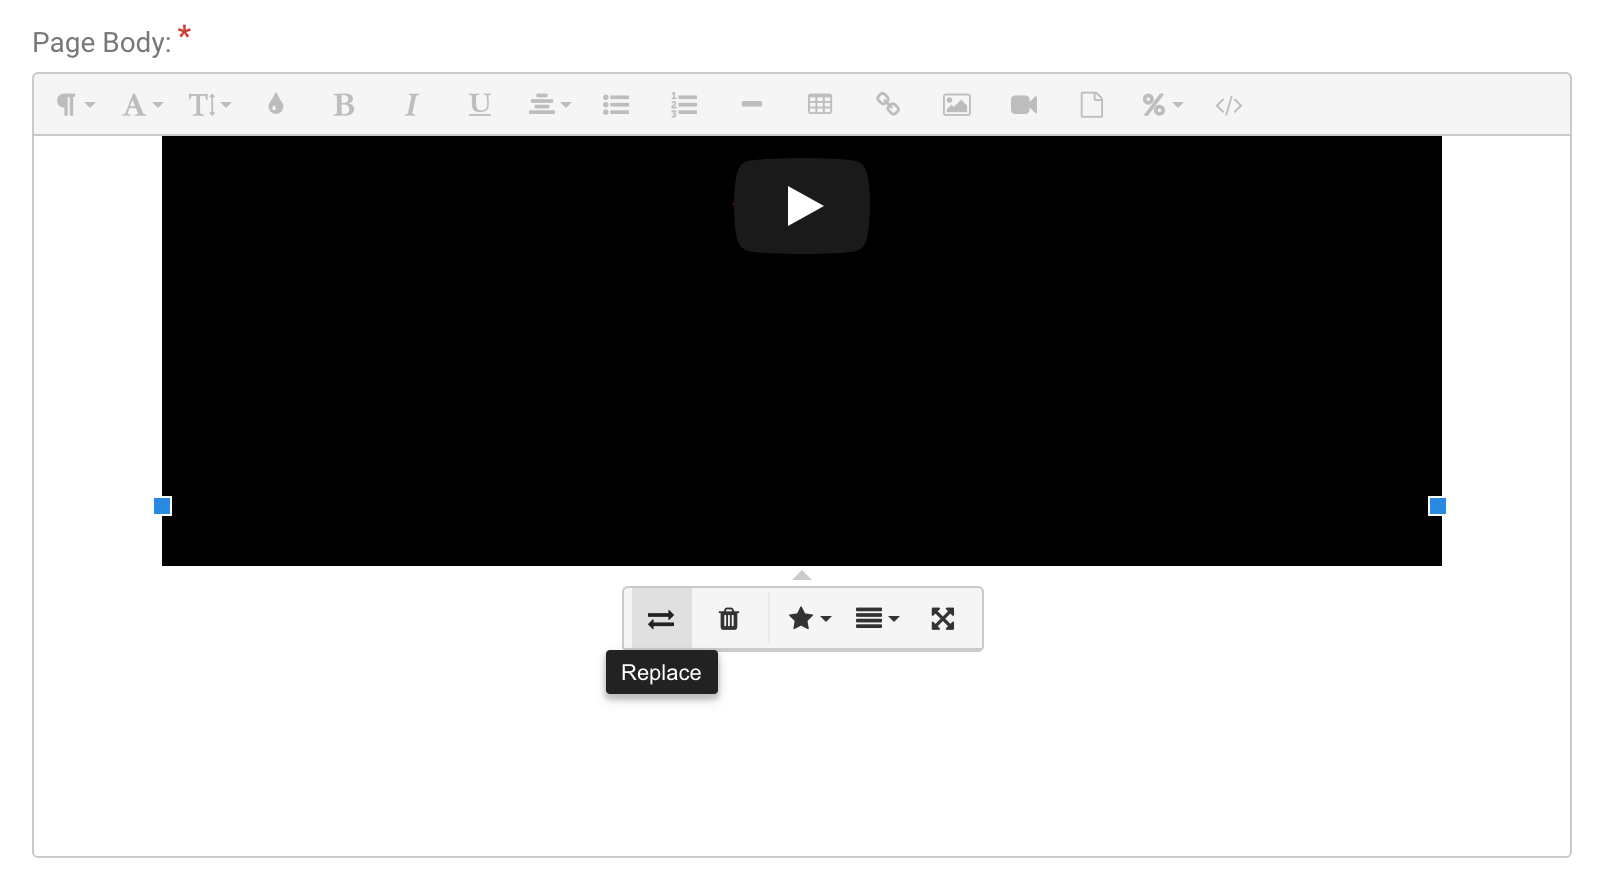
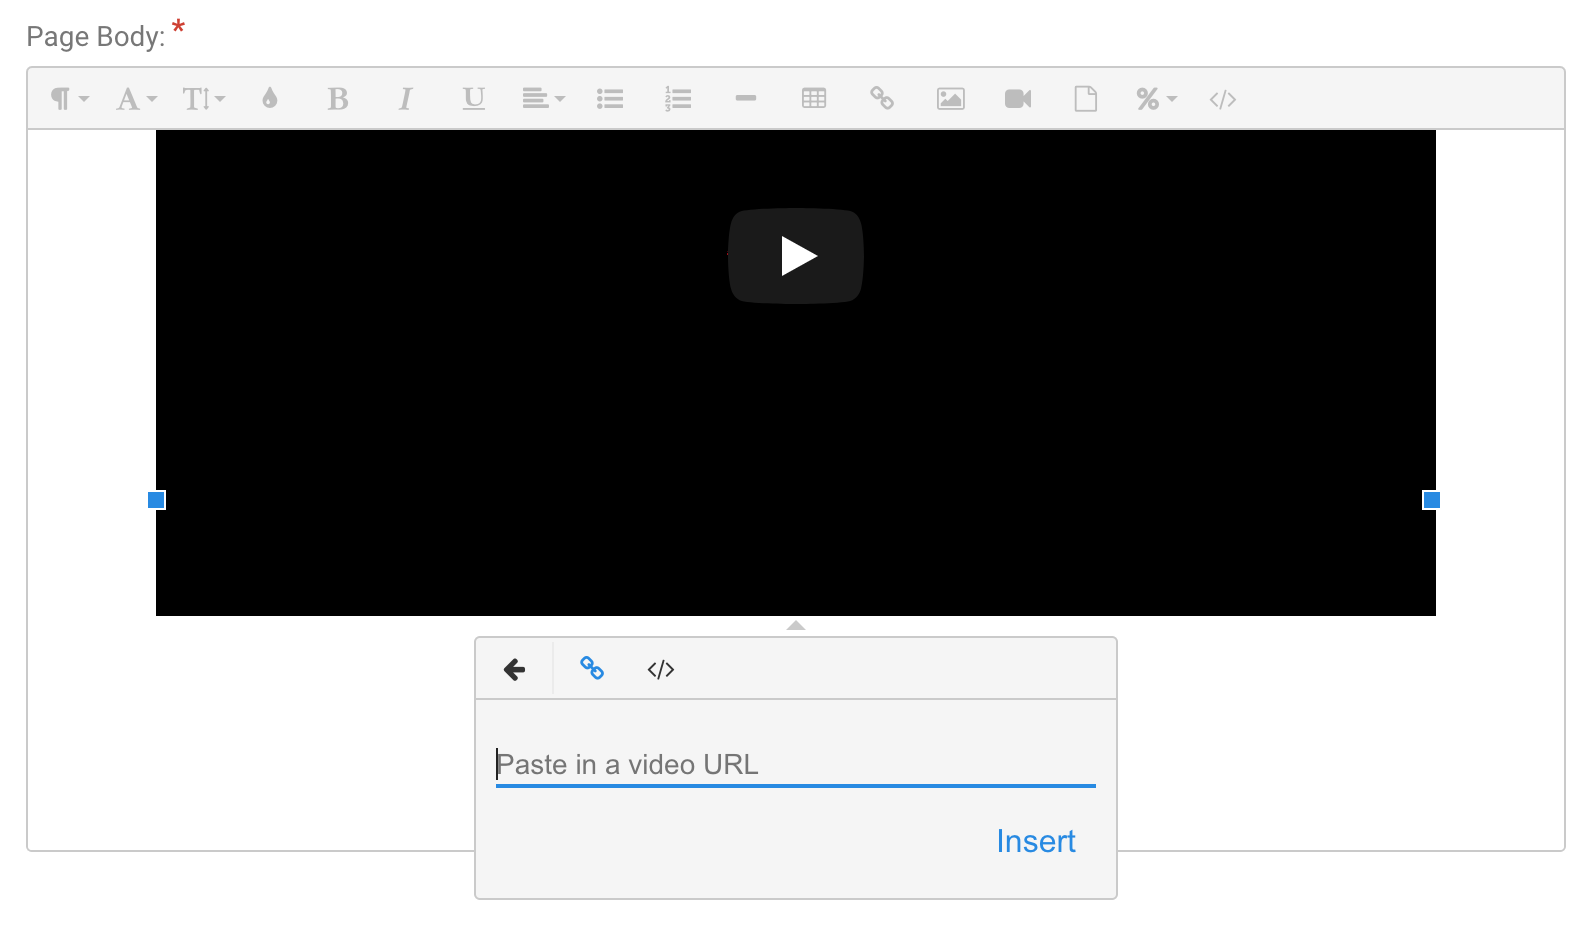
For virtual and hybrid event types, the Express Self Check-In Page includes a video placeholder. To replace the placeholder with your actual video:Click the video placeholder.
Click the Replace icon in the little toolbar that appears beneath the video.
Add the link to your video from YouTube or Vimeo.
Or add the embed code from YouTube or Vimeo.
To add the link to your Facebook, you can delete the video placeholder, click the link icon in the toolbar at the top of the Page Body field, and add the link.
Note: Facebook livestream windows cannot be embedded into this template.
Option 2 - Redirect your guests to the video stream page:
Delete the video placeholder and add a link to the video stream page (such as YouTube or Vimeo) by clicking the link button and adding the URL and the Text they will click.
Or add an image by clicking the image icon, and then add a link to the image.For either link or image, choose "Open in a new tab" so the video will show in a different tab and guests won't navigate away from the Express Self Check-In window when they click the link.

You can even use this to put a Zoom link and log-in information. It's secure because this page is only available via an email that you send.
Add a Give button
For virtual and hybrid events, the Express Self Check-In Page includes a default Give button which links to your Event Web Page. To link it to your giving site instead so that your attendees can make a donation:
Click the image and click the Edit Link icon in the toolbar that appears.
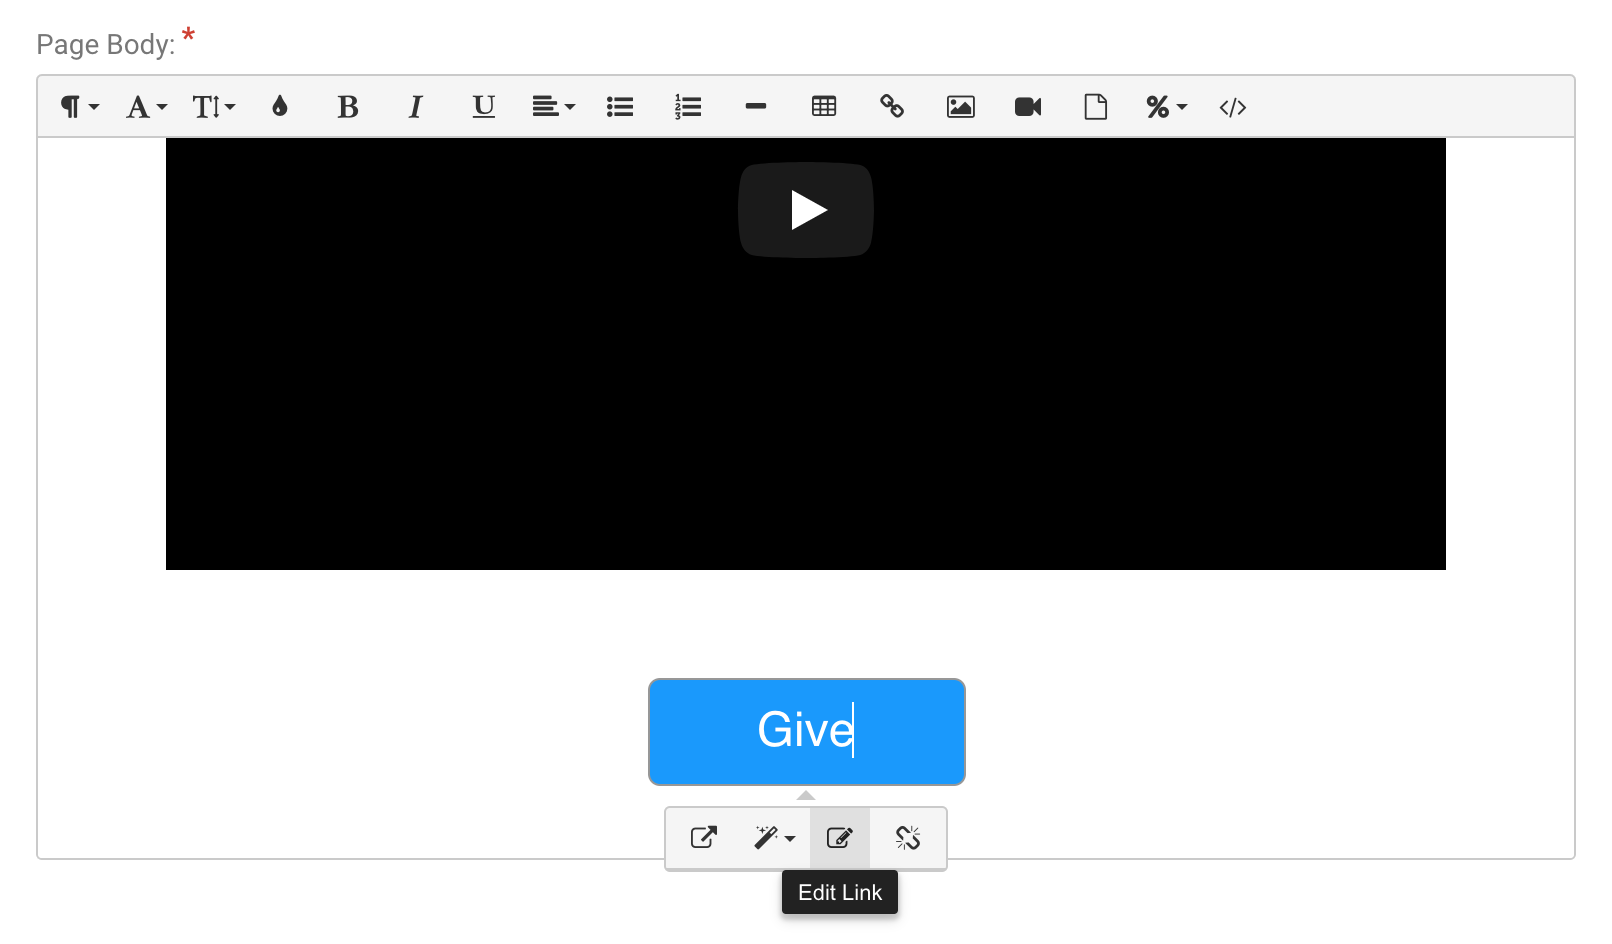
Replace the URL with your giving site's URL, check the "Open in a new tab" checkbox, and click Update.
After making these edits to the Express Self Check-In Page, save your work by clicking the Done button in the lower right corner!
Create Your Announcement Email
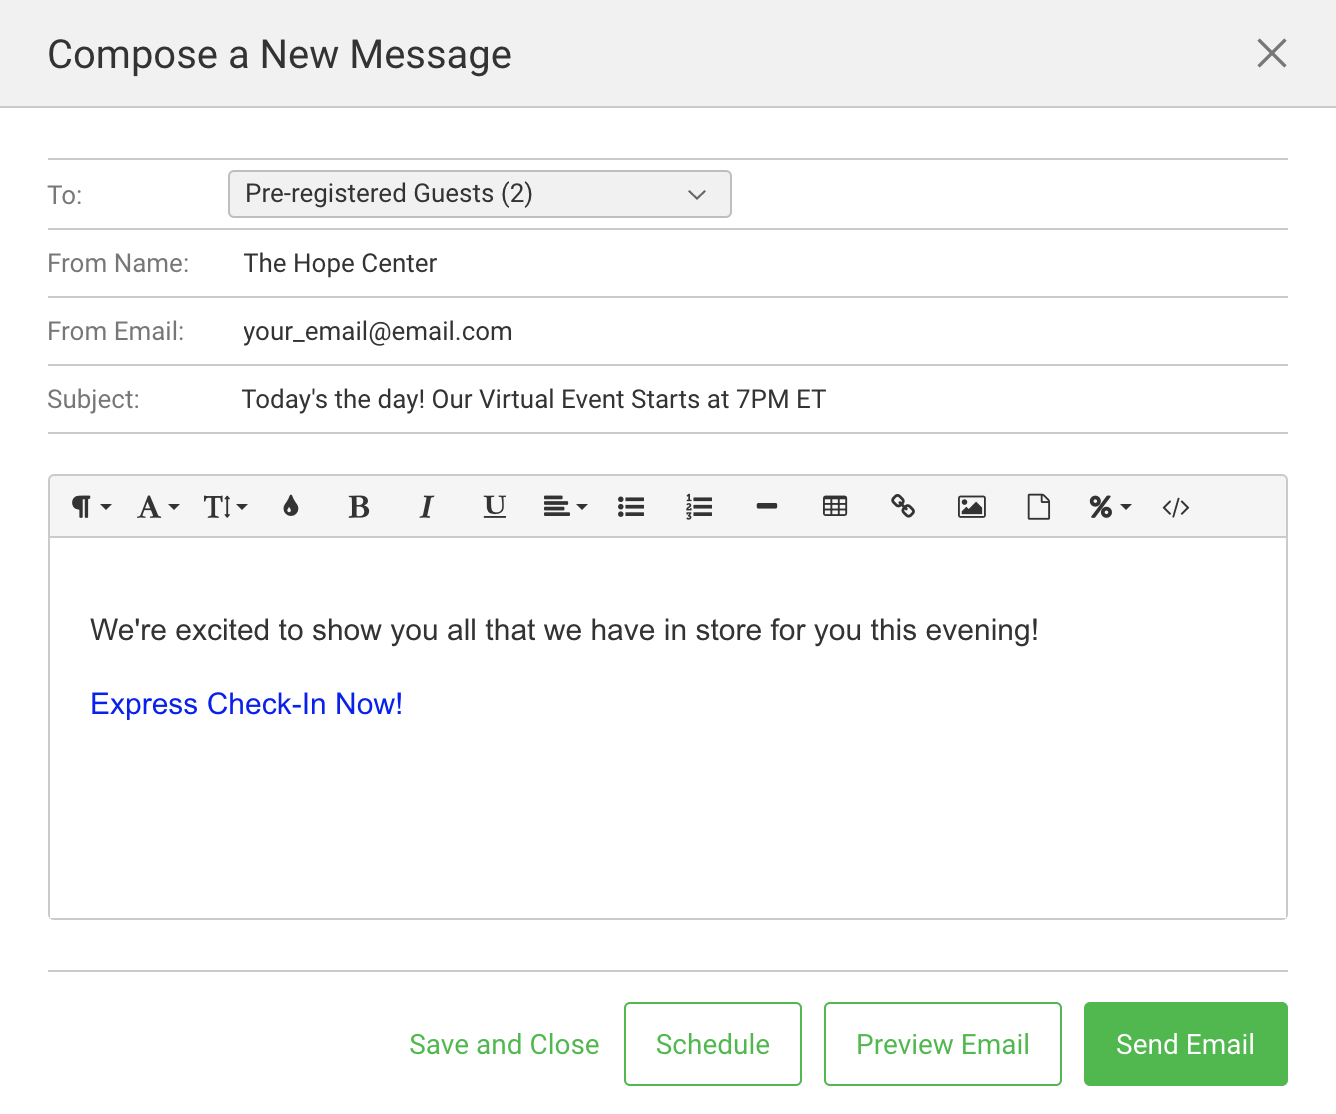
Finally, when you're nearly ready to go live, you'll need to create the email that you'll use to announce the start of your event.
Go to Send Email in the left toolbar.
Choose your audience in the pulldown, usually Pre-registered Guests for virtual events or Virtual Guests if your event is a hybrid event and the email should only go to guests who are attending virtually.
Note: If you're segmenting your list, you can select individuals or groups from Manage Registrants and use Bulk Actions to send your email.
Add a title for your email.
Compose your email.
Use the variable list (%) in the toolbar to add variables, like first name, to personalize the email.
Scroll to the bottom of the variable list and choose %ExpressSelfCheckInLink%. This adds the link to the email that will start the check-in process.
If you want to change the wording on the link, click the link, choose Edit Link, and edit the wording. Make sure you don't change the %ExpressSelfCheckInLink% variable.
You'll want to click the Preview Email button before you send the email to make sure it looks good to you!
You can save the draft to edit and send later by clicking the Save and Close link, schedule the email to send at a specified time using the Schedule button, or click the Send Email button if you're ready to send the email.
Reporting
For events created with the new virtual event type, you can run a report at any time in the Custom Report Builder and include the Registration Status field to see who checked in. This information will also be available in the Live Check-In section in your event.
For in-person or hybrid events (or virtual events created before the new virtual/hybrid/in-person event types were released), the attendance data will be available in the Custom Report Builder at any time and will be available on the Live Check-In page after your event is over.