This article covers:
Recording offline and online donations
Refunding payments
Changing the payment method or the amount for Peer-to-Peer offline donations
Adding transactions
Combining fundraising pages (or moving sponsors to other pages)
Editing the invoice description after reassigning a sponsor.
Recording Offline Transactions - There are two steps to recording offline donations in Peer-to-Peer: recording the offline transaction and recording the payment.
Your Participants can add offline donations from the Sponsor tab on their fundraising page when they are logged in. As an admin, you have tools inside Peer-to-Peer to add sponsorships to someone's page for them.
To add a Sponsor to someone's page, click Register Person in the left navigation menu from any page in your event.

Choose Sponsor (or Donor) from the popup window.
Complete the form and click Register.
The Sponsor form includes options that may not be available to the general public, such as pledge and cash. We recommend that you not use the Participant's page to record sponsorships, since not all payment options are commonly available.
Use the Column Browser to record or refund payments. You'll find the link for the Column Browser in the Event Tools menu.

Recording Offline Payments - Online payments are marked paid when they are recorded. However, offline donations aren't marked paid since the money hasn't been received in your office. This helps you keep track of money that is still outstanding. You'll want to record the payment when the money is turned in. Note: If you're using an integration like WayCool (CoolFocus) or eKyros, it's usually best to record payments in FundEasy before you export to these tools. You may import duplicates if you record the payment in your donor software before recording it in FundEasy and exporting your data.
Find the person's name in the bottom of the Column Browser. It's usually easiest to find the Participant on the top of the page first and click the checkbox next to their name to narrow down your view. Note: Make sure the Show Below dropdown shows the registration type you're looking for, like Donor or Participant.
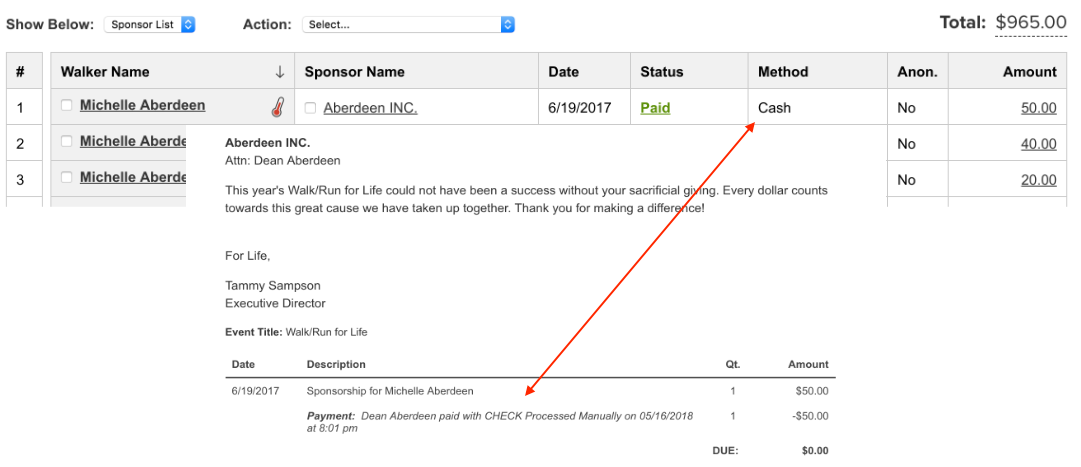
Click on the Not Paid link in their Status column. This opens the Profile Transaction screen. If the window doesn't open, please read this.
Click the Pay button.
Choose the Payment Method.
Record the Payment Details. Note: Entering a check number will mark the donation as paid by check instead of cash. Check numbers are not listed in Receipts or in Peer-to-Peer Donation Receipt Emails.
Clicking the Process button will return you to the Column Browser.
You may need to refresh your screen to see that the payment icon has changed to paid.
Note: if the payment is for more than the original amount reported, record the original payment, save your changes, and then click Add New Transaction to add a transaction and record payment for the additional amount. Read more about adding transactions
Young Life events don't use FundEasy's processor, so the Column Browser will not update automatically when payments are made. Use your reports from Young Life transactions to manually record payments to keep track of your event progress.
Refunding Payments
Refunding payments requires two steps - one in Stripe and one in FundEasy. Returning the money needs to be done from within your Stripe account. After initiating the refund in Stripe, you will need to mark the payment as Refunded in FundEasy from the person's transaction log. Editing that status in the transaction log marks it refunded for internal FundEasy reports. The refund does not go to the customer until it is completed in Stripe. Once you have refunded the payment in Stripe using these instructions, use the following steps to mark it as Refunded in FundEasy:
Find the person's name in the bottom of the Column Browser. It's usually easiest to find the Participant on the top of the page first and click the checkbox next to their name to narrow down your view. Note: Make sure the Show Below dropdown shows the the registration type you're looking for, like Donor or Participant.
Click on the Paid link in their Status column. This opens the Profile Transaction screen. If the window doesn't open, please read this.
Check or Cash payments automatically use the Process Manually option. For manual refunds, it's up to your office to send the refund to the payer.
Online transactions should be refunded through the processor (instructions linked above).
Clicking the trash can icon deletes the record of the transaction. It does not refund it.
Once the donation is refunded, the payment status in the Column Browser will change to Refunded.
Refunds usually take 5-10 business days. There is no additional fee for refunds, however to return the total amount to the payer, Stripe will deduct both the deposited amount and the processing fees from the organization's account.
Changing the payment method of an Offline Sponsorship in Peer-to-Peer
The payment method that shows in the Column Browser and the payment type that shows on the donation Receipt can be different. A donation that is listed as a pledge in the Column Browser will show as paid with the actual payment type on the donation Receipt.
When a donation is recorded on a fundraising page, their payment method is recorded with the donation. This is the payment method that shows in the Column Browser.
When you record the actual payment, you can enter the actual payment type, which is what shows on the Receipts to the donor. It is also listed as the Payment Type in Reports.
Changing the Amount of an Offline Sponsorship in Peer-to-Peer
Find the Sponsor on the bottom part of the Column Browser.
Click on the payment status or the dollar amount to open the Profile Transaction screen.
Click the trash can icon to delete the transaction.
Click the Add a Transaction link in the Profile Transaction screen to add a new transaction in the correct amount.
Adding Transactions
Find the person in the bottom of the Column Browser.
If the person is a Participant and is adding registration fees, remember to change the Show Sponsors pulldown in the middle of the page to Show Participants.
Click Paid or Not Paid to open the Profile Transaction screen (if there is no Paid or Not Paid icon, click the 0.00 link).
Click the "Add New Transaction" link at the bottom left side of the window.
Enter in the date (today's date will be automatically filled in; select a different date from the calendar if you wish), a description for the transaction, and an amount.
Click Go.
The transaction you just created will be added to the Transactions list. Notice that it is Pending.
If the registrant is paying now by credit card, click Pay and click Credit Card. Enter all of the credit card information into the new window that opens.
If the registrant is paying by check, you will not need to click Pay until you have received his check in hand. You can return to this screen at a later time, click Pay, and click Cash or Check. Enter the appropriate information.
Combining Fundraising Pages
You can easily reassign Sponsors (or move Donors) from one Participant to another from the Column Browser. This is useful if someone sponsored the wrong person or if you want to combine pages if someone has more than one page.
Click the check box next to the Sponsor's name in the Sponsor Column on the bottom part of the Column Browser
Click Reassign in the Actions pulldown.
Find the correct registrant in the pulldown.
Click Reassign.
Edit the Invoice description to the correct participant.
Cancel the registration for the extra page.
If you're moving a donor from one participant to another (vs. combing duplicate pages for the same participant), you'll want to edit the description of the donation to reflect the correct participant. When a transaction is made, the description of that transaction is recorded in the database. This information doesn't change when you edit the Person Profile or reassign a Sponsor. You can, however, edit the transaction description from the Profile Transaction screen.
Click the payment icon to open the Profile Transaction screen.
Click View to see the description.
Click Edit to edit the information.
Then click Save.
This will update this information in Profile Transactions and in Peer-to-Peer Invoices and Receipts.