Selecting your Name Tag template.
Click the Name Tags icon in the Event Tools navigation menu on the left.

Click the Select a label drop down to choose your label number. Note: We no longer add labels other than Avery Labels. If the Avery label number that you need is not listed, click the Don't see your label? link, and fill out the form to request your label number. We will add your item to the list of available choices within 24 hours.
Click on a default Name Tag template that you would like to customize.
Click Customize Selected Label.
A message will remind you that you cannot directly change a default template, and will prompt you to name your label. Enter in a name for your new label.
Click OK.
Copy an existing label to a new template
If you have a Name Tag that you have used in the past that you'd like to reuse, you can use it as is, or you can copy it to another template.
Click on a Name Tag template that you would like to customize.
Click Copy Selected Label.
Enter a name for the new label.
Click OK.
Editing your Name Tags
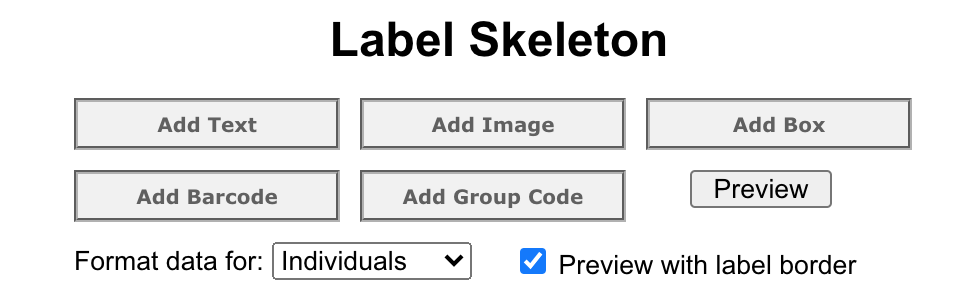
Each line in the Label Skeleton is a different item on the label. Hide or show any item by turning off or on the light bulb icon.
To edit an item, click the icon that looks like a piece of paper.
To add other options, use the buttons at the top of the Label Skeleton
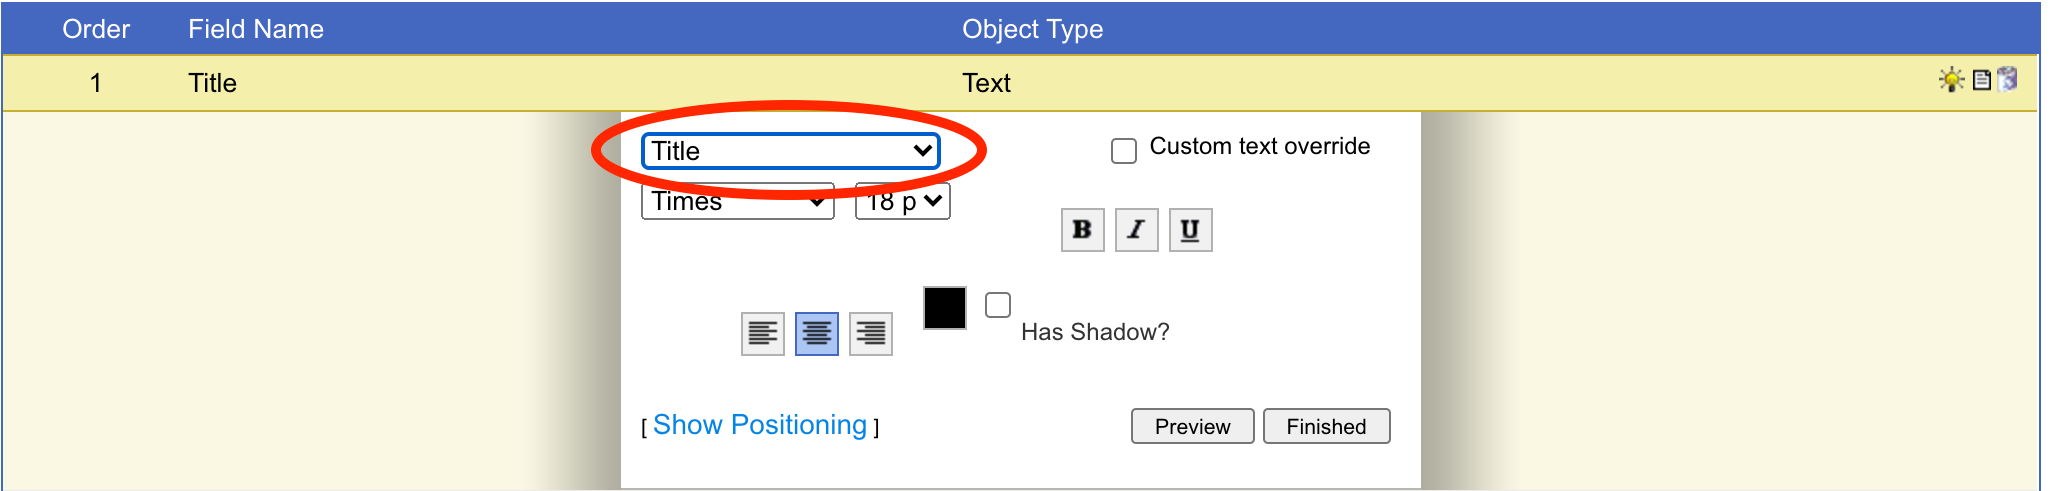
Add Text lets you choose a field from your Registration Form, like Meal Choices. Click Title to see options in that list. Or choose custom text override to add your own text.
Add Image lets you upload an image. Make sure your image has a background (is not transparent). Otherwise, the background will be black. You can make an image larger or smaller from inside the edit options, but if you have made it as large as the image allows, to make it larger, you'll need to upload a larger image. Images over 500KB will be compressed.
Add Box adds a colored box to your label. This can be used for a banner or a backdrop.
Add GroupCode lets you add fields that are integrated into FundEasy, like Table Number and Table Host (which is just the words, "Table Host," not the name of the host). Table Numbers will not show on the label until Groups have been assigned to tables.
You can move items on your Name Tags using the tools in the edit mode.
Click Show Positioning to access sliders that move the object left and right and up and down.
You can also right or left justify or center your object.
Using both justify and sliders can make the object appear on a neighboring label. Try one at a time and preview often.
You can also reorder items on your labels by dragging them up and down in the Label Skeleton. Think of each item as a layer. If you add a background image and it’s at the top of the list, it will cover any text on the name tag. Drag and drop it to the bottom of the list to move that layer below everything else.
To see how your label looks after you make formatting changes, click the Preview button. The preview will appear in a popup modal.
If you want to merge the names on your name tags, use the "Format data for" pulldown to choose between Individuals and Couples. Note: In order for couples to merge properly, they need to be linked together in their profiles.
Peer-to-Peer/Attendance Training Video: Name tags
(Read video transcript here.)
Once you have your name tags set, you're ready to print.