Off-Site Setup Instructions
Activate Live Check-In
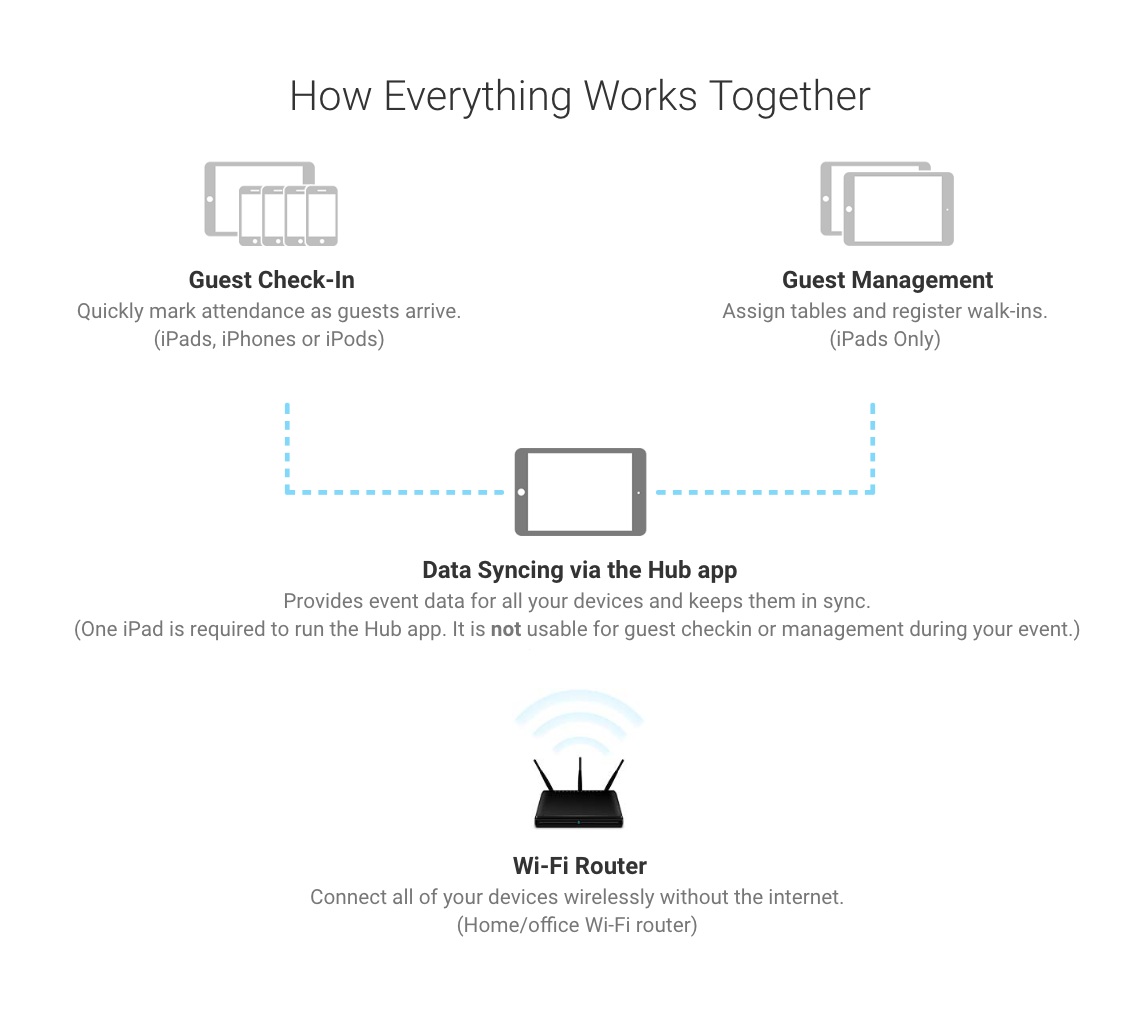
Prepare the Hub
Prepare Guest Check-In and Guest Management
On-Site Setup Instructions
Setup the Router
Join All Your Devices to the Router
Start the Attendance Live Check-In Hub app
Start the Attendance Live Check-In app on All the Other Devices
Tear Down After Your Event
Post Event: Uploading Your Attendance Data back to FundEasy
Off-Site Setup Instructions
ACTIVATE Live Check-In within Your Event Tools
1. Click on Attendance Live Check-In in the list of event tools. We recommend that you do this step well before your event so you have access to the information in the Prep Checklist (step #4).
2. Click the green "Activate Live Check-In" button
3. Complete the prompts to estimate attendance, assign device roles and confirm and activate
4. Review the Prep Checklist to learn important information about what you'll need to run Live Check-In
PREPARE The Hub
(Internet is required to set up your Hub, so you should do this prior to your event.)
1. Designate an iPad to be the Hub for your event.
2. Download and install the "Attendance Live Check-in Hub" app from the iTunes App store.
3. Launch the app.
4. Enter your FundEasy username and password into the app.
5. Follow instructions on the screen to download your event data onto the Hub.
6. Put the iPad Hub to sleep when the Hub app says, "Go to Your Venue."
PREPARE Guest Check-In and Guest Management
1. Download and install the "Attendance Live Check-In" app from the iTunes App Store.
2. Designate which iOS Devices you will use for Guest Check-In and Guest Management. Remember that you must use an iPad for Guest Management.
NOTE: Live Check-In was designed specifically for iPads and iPhones. Live Check-In can be run on Mac laptops that have an M1 chip or above, but you may experience connectivity or display issues even on compatible Mac laptops. To find out if a Mac laptop is compatible, click the apple icon in the top right corner of the screen and choose About This Mac. You can also go to the App Store on the laptop; the Live Check-In app will show up when you search for it in the App Store if the laptop is compatible with Live Check-In. We recommend practicing with Live Check-In using the specific devices you plan to use at your event to ensure the best experience.
Note: You can run either the Hub app or the check-in/management app on a device. Do not run both apps at the same time on the same device.
On-Site Setup Instructions
Setup the Router
1. Find a power outlet that is centrally located to where you will be using Live Check-In.
2. Plug in the device.
3. Wait for a yellow light to flash on the device... that’s it!
Do not physically connect any USB cables to the Router.
Join All Your Devices to the Router
1. Power on all your devices.
2. Find and launch the “Settings” app on each device.
3. Tap on “WiFi” within Settings.
4. Join the network that is associated with the Router.
Start the Attendance Live Check-In Hub app
1. Make sure the iPad Hub has joined the Router. Follow steps above to Join.
2. Launch the app called "Hub" and follow the onscreen instructions.
3. Once you see "Good to Go!", plug the power cable for the iPad Hub into a wall outlet.
Failure to do this could result in the iPad Hub running out of battery during your event, causing Live Check-In to stop working.
4. Keep the iPad Hub in a central location. Next to the Router would be ideal.
5. If your iPad has a cover, keep it open! Closing the cover could turn the device off, so be careful.
Start the Attendance Live Check-In app on All the Other Devices
1. Make sure each device has joined the Router. Follow steps above to Join.
2. Launch the app called ‘Live Check-In.’
3. Select a role for the device: Check-in Guests or Manage Guests (for special registration table iPads only).
4. The Live Check-In app should sync up with the iPad Hub and display your event guests.
Tear Down After Your Event
1. Go to the iPad Hub and tap the red “Finish Live Check-In” button.
2. Pack up all the devices and unplug the Router.
Post Event: Uploading Your Attendance Data back to FundEasy
If you have WiFi internet at the venue, you can upload your attendance data immediately.
1. Take the iPad Hub to a place with WiFi internet (Starbucks, home, office).
2. Find and launch the “Settings” app.
3. Tap on “WiFi” within Settings.
4. Join the network that has internet.
5. Launch the Hub app again and follow the onscreen instructions to upload your attendance data back to FundEasy.
6. When you are finished, be sure to leave feedback so we know how you enjoyed Live Check-In!
Watch the Live Check-In Tutorial Video (4:33).
(Read video transcript here.)